Create Something Special with the Iris Cardmaking and Papercrafting Kit – Floating Topper Tutorial Included
Create Something Special with the Iris Cardmaking and Papercrafting Kit – Floating Topper Tutorial Included
Published: February 19, 2026
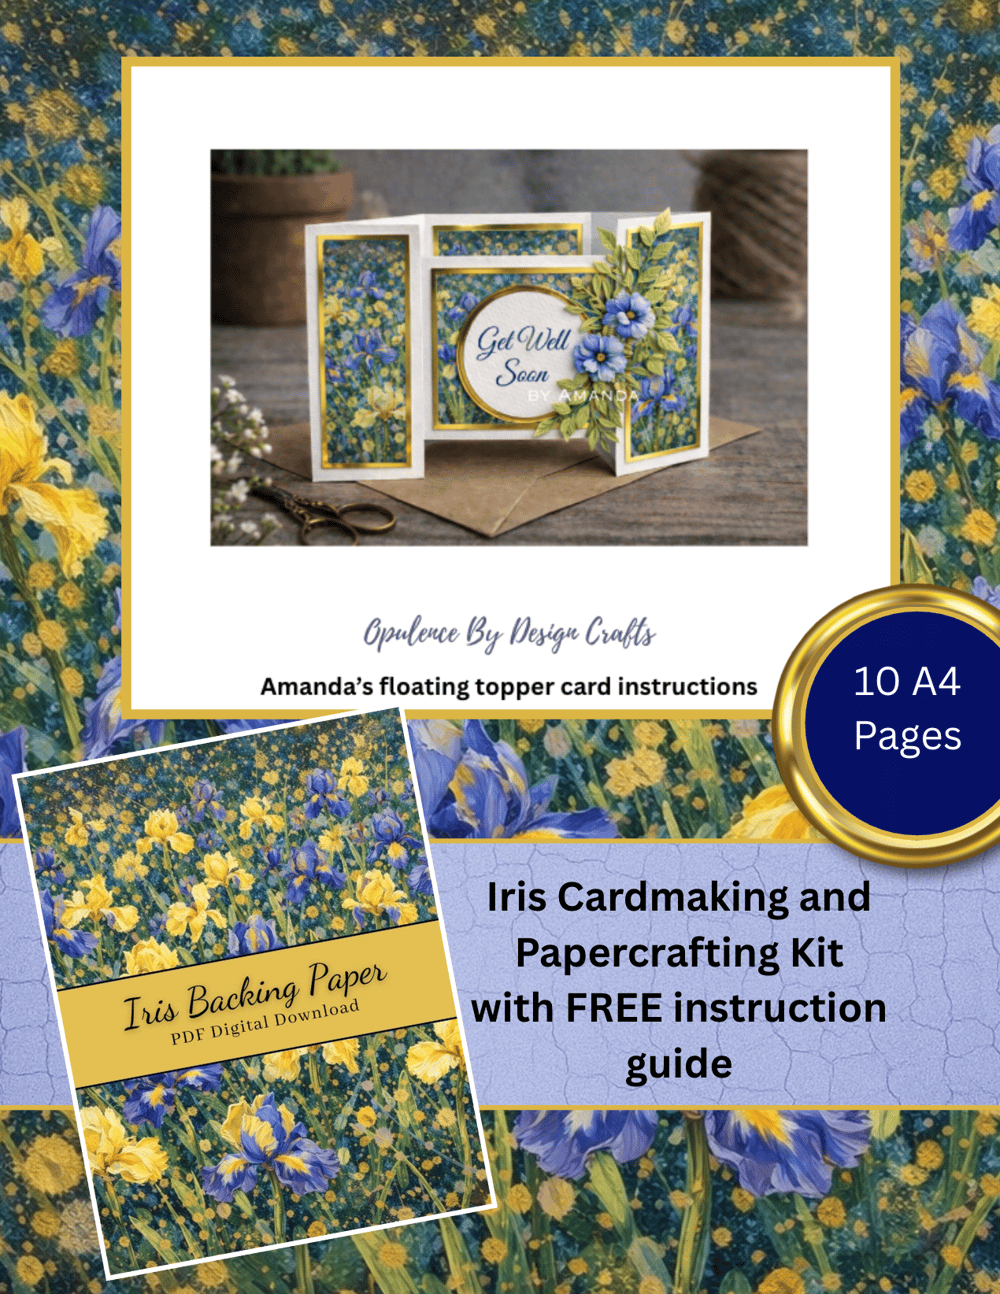
Introducing the Iris Cardmaking & Papercrafting Kit
Opulence By Design Crafts – PDF Digital Download
With FREE Amanda’s Floating Topper Card Instructions Guide
(Intermediate to Advanced)
I am delighted to introduce this brand new Iris Cardmaking and Papercrafting Kit. This collection has been thoughtfully designed for crafters who enjoy layering, dimension and creating elegant statement pieces with professional coordination throughout — especially those who love fancy fold or fun fold cards.
This is a two-part digital download, so please ensure you download both elements included with your purchase.
The kit is available as a digital download on the website here: https://shop.obyd.co.uk/b/bUJ2H
Part 1 – What’s Included in the Kit?
This download contains 10 A4 sheets plus a written instruction guide, giving you everything needed to create beautifully layered projects.
Attachment 1 – The Kit (10 A4 Sheets)
You will receive:
Page 1 – Iris Design Paper (Smaller Flowers)
Page 2 – Iris Design Paper (Larger Flowers)
Page 3 – Yellow Iris (Different Shade – Small Flowers)
Page 4 – Yellow Iris (Different Shade – Larger Flowers)
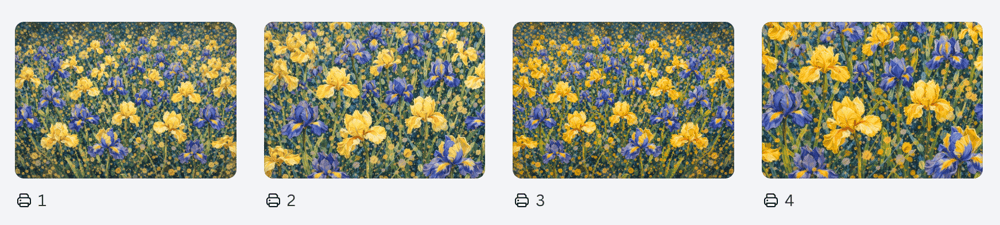
These patterned papers are ideal for:
- Card fronts
- Layered panels
- Backgrounds
- Cutting into sections for feature designs (focal point toppers)
- Backing Papers
- Collage projects
- Album and Junk Journal Projects
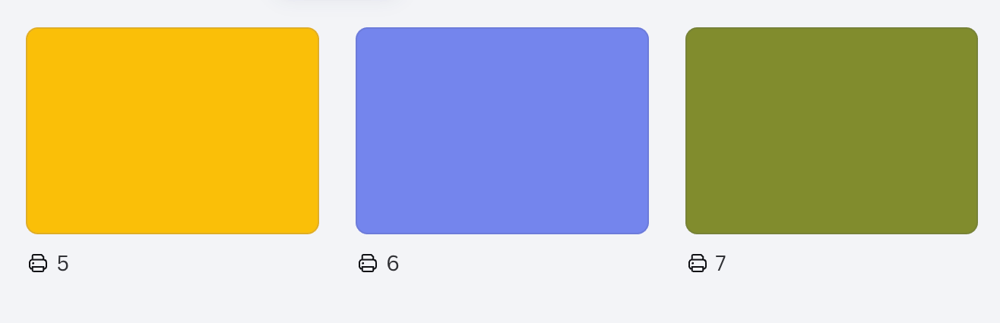
Coordinating Plain Sheets
To make your projects cohesive and effortless, the kit includes perfectly matched plain sheets:
Page 5 – Plain Yellow (Ideal for matting, layering, die-cutting and embossing)
Page 6 – Plain Iris Blue (Perfect for depth and contrast)
Page 7 – Plain Green (Beautiful for foliage accents and bases)
These coordinating sheets allow you to achieve a polished finish without searching for matching cardstock.
If you have access to embossing folders this makes a really nice option for decorating panels on cards or for using as backgrounds
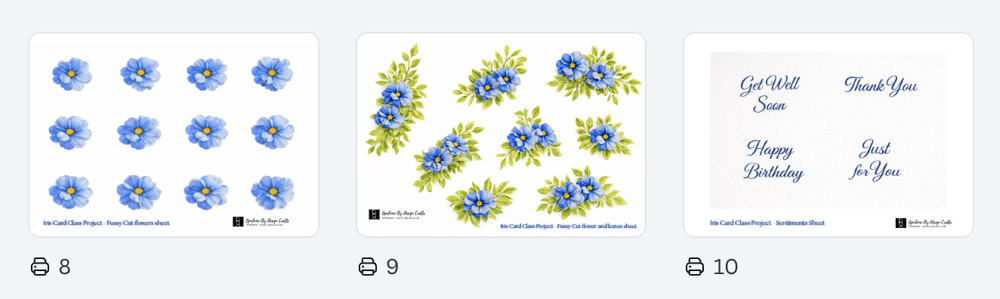
Embellishment & Detail Sheets
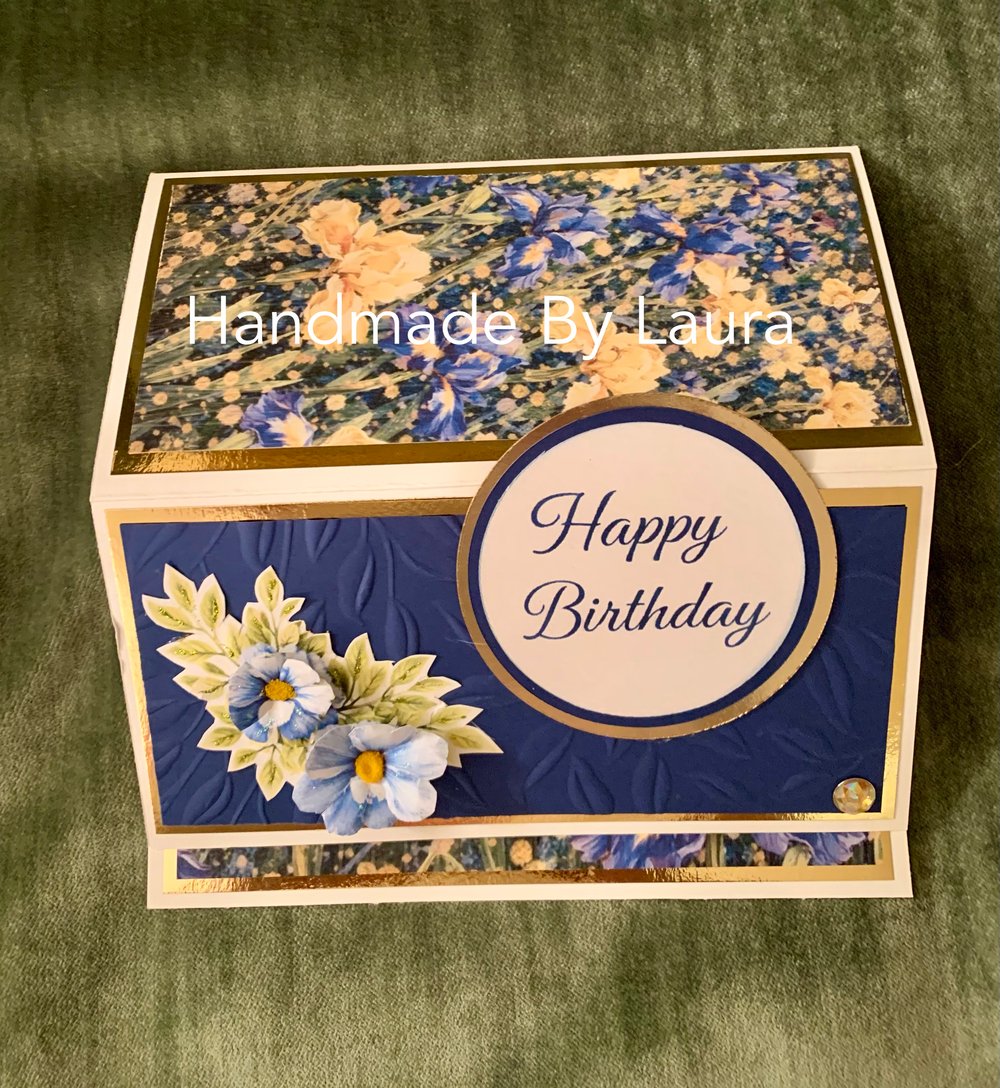
Page 8 – Fussy Cut Flower Sheet - The beautiful blue flowers you see on the samples have all been made using this sheet
Page 9 – Fussy Cut Flowers and Leaves (Embellishments) Check out Laura's cards below she used these perfectly on her design team sample cards.
Page 10 – Sentiments Sheet
The fussy cut sheets are perfect for:
- Layering and decoupage
- Building dimensional floral clusters
- Creating focal points
- Adding movement and depth
- decorating the inside or cards or even envelopes or boxes so your project has a lovely cohesive finish.
The sentiments complete your projects with a professional finishing touch.
Attachment 2 – FREE Amanda’s Floating Topper Card Instructions Guide
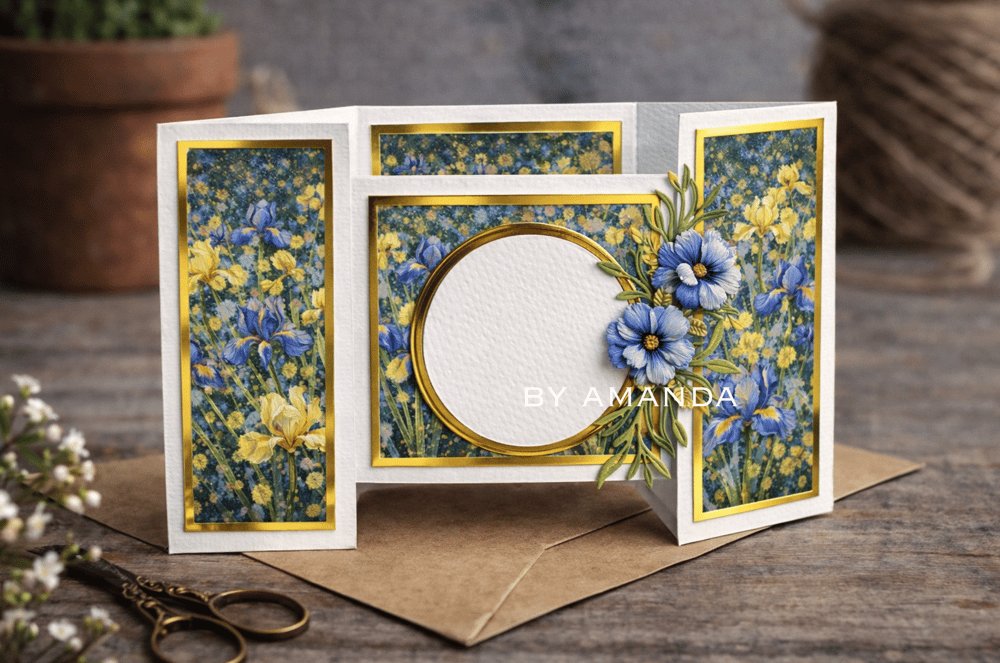
This step-by-step written guide explains how to construct the floating topper card base featured in the main sample. This design is particularly suited to intermediate to advanced crafters who enjoy structured builds, dimensional techniques and fancy fold or fun fold card styles. The fold is rather easy to create with the instructions provided but a little experience is helpful for decorating panels and making up the flowers.
Part 2 – Inspiration & Creative Ideas
While the floating topper card is a beautiful centrepiece project, this kit is extremely versatile. Here are some other uses for the kit
Elegant Statement & Fancy Fold Cards
Create:
- Layered 7x7 or 8x8 cards
- Floating panel designs
- Fancy fold and fun fold constructions
- Dimensional floral centrepieces
- Shaped card bases
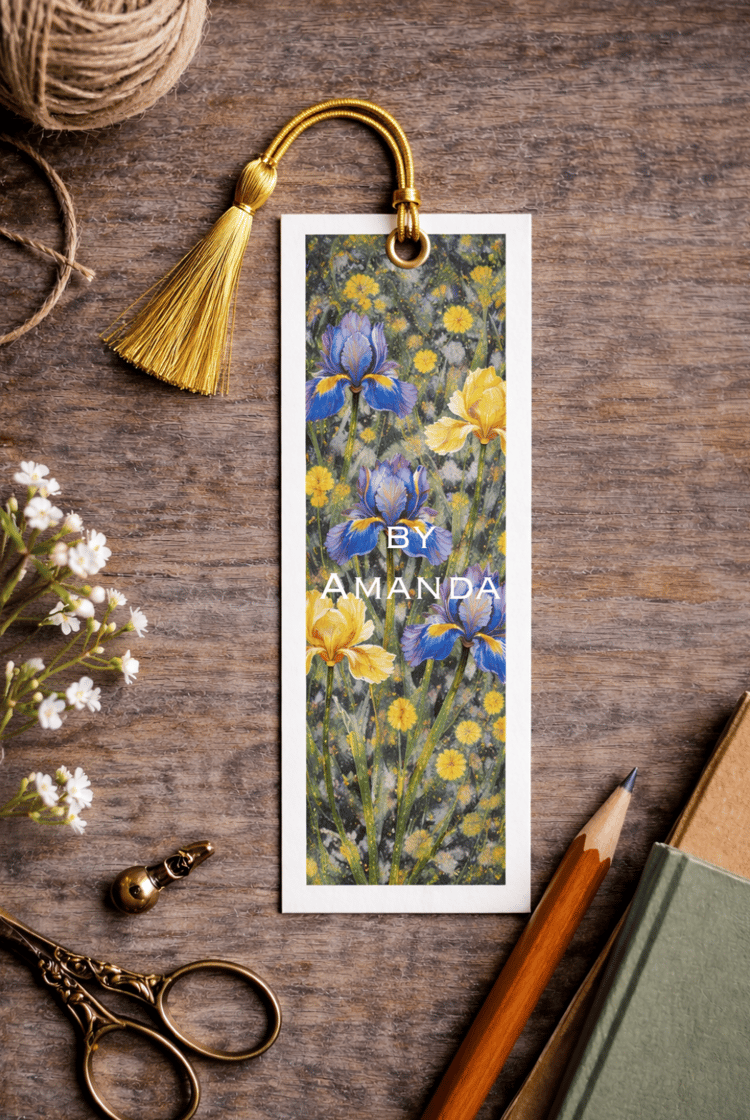
Tags, Bookmarks and ATC's
Create:
- Tags for gifts
- Mini tags for your cards
- Bookmarks
- ATC's - artist trading cards
- Decorating Gift Boxes
- Decorating Gift Bags
3D and Decoupage Projects
Use the fussy cut sheets to:
- Build realistic layered blooms
- Add foam pads for depth to create your own 3d embellishments
- Create corner clusters or little arrangements to adorn your handmade cards and projects
Scrapbooking & Memory Albums
The patterned papers are ideal for:
- Photo mats
- Journal page backgrounds
- Decorative borders and panels
- Use with your dies to create your own shaped frames using the Iris or Plain papers for your photos to sit in
- Spring or garden-themed layouts
Home Décor & Mixed Media
You could:
- Frame a layered iris design
- Create decorative panels
- Use embossed plain sheets for textured backgrounds
- Combine with MDF bases for dimensional projects
- Decopatch/ Decoupage onto blanks/ glassware or mdf pieces
This kit has been weeks in development, with careful thought given to coordination, versatility and structure.
I wanted it to feel complete — giving you patterned papers, embellishments, sentiments and a structured project guide all in one collection.
Here are a few more design team samples using the kit just for added inspiration
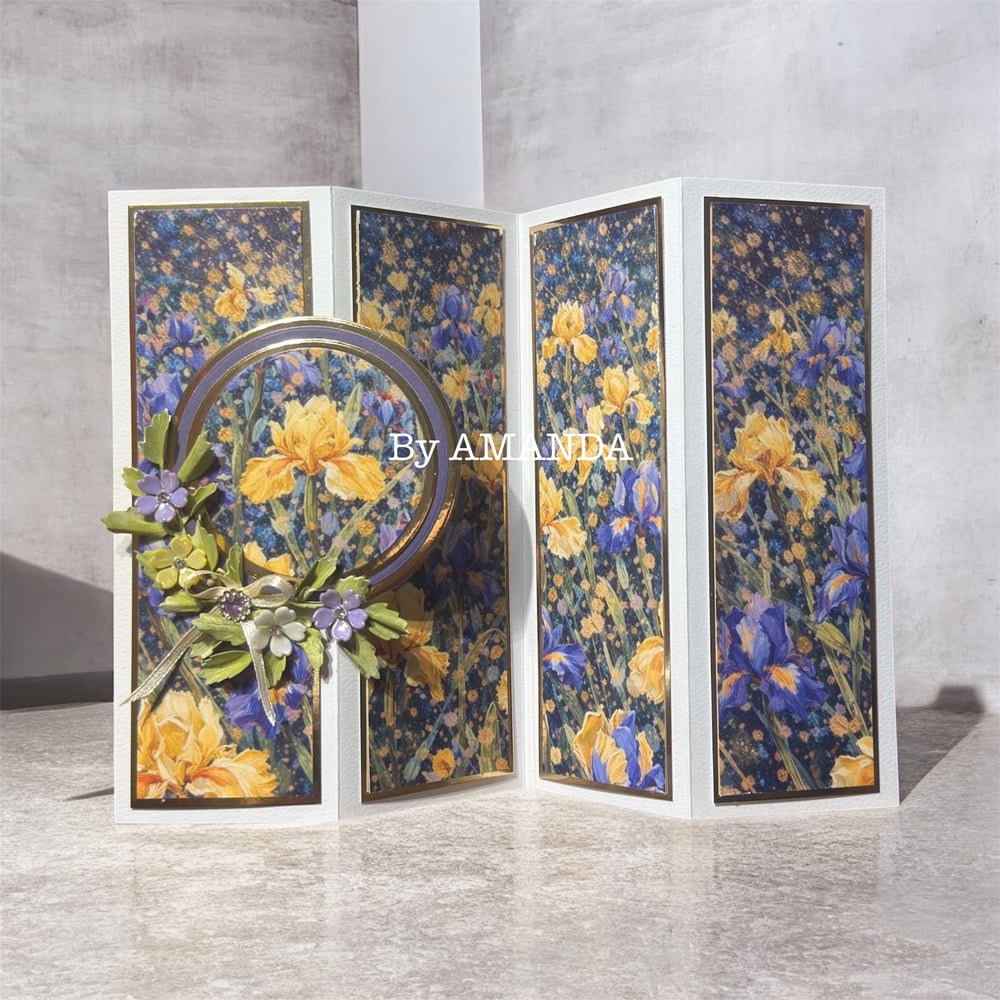
Once you have mastered the fold you can change this up and make it look quite different just by changing the height of the card used or maybe add 1 inch to each of the panel measurements to make it longer.
It is so adaptable
You can choose what side to have your topper on and how you decorate it
You will also have fun choosing what panels to decorate - if you have access to embossing folders don't forget to use the plain sheets to emboss so you have nice coordinating colours to work with the rest of the kit
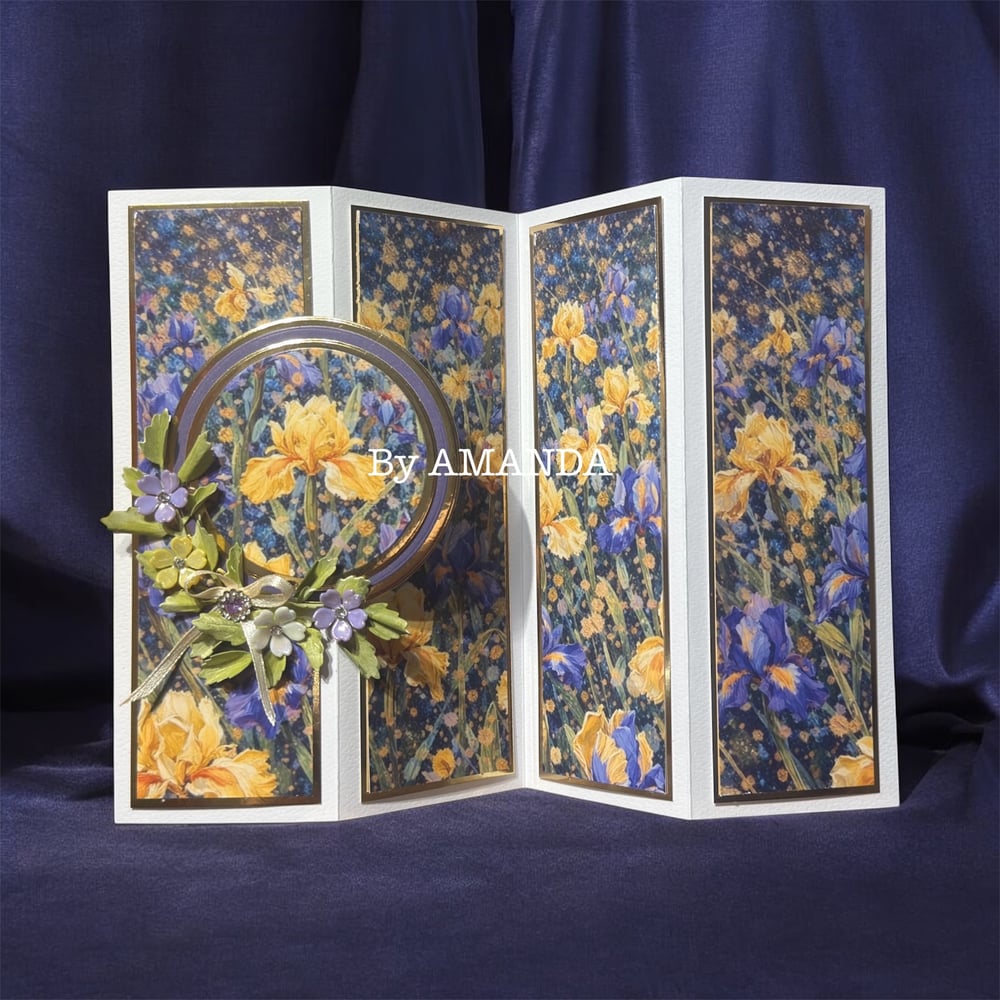
This is a Concertina Card, i made a focal point topper just by die cutting one of the Iris flowers out of the backing paper. Simple matting and layering completes the card base then i decorated it with some Resin flowers, die cut foliage, a little bow and some gems
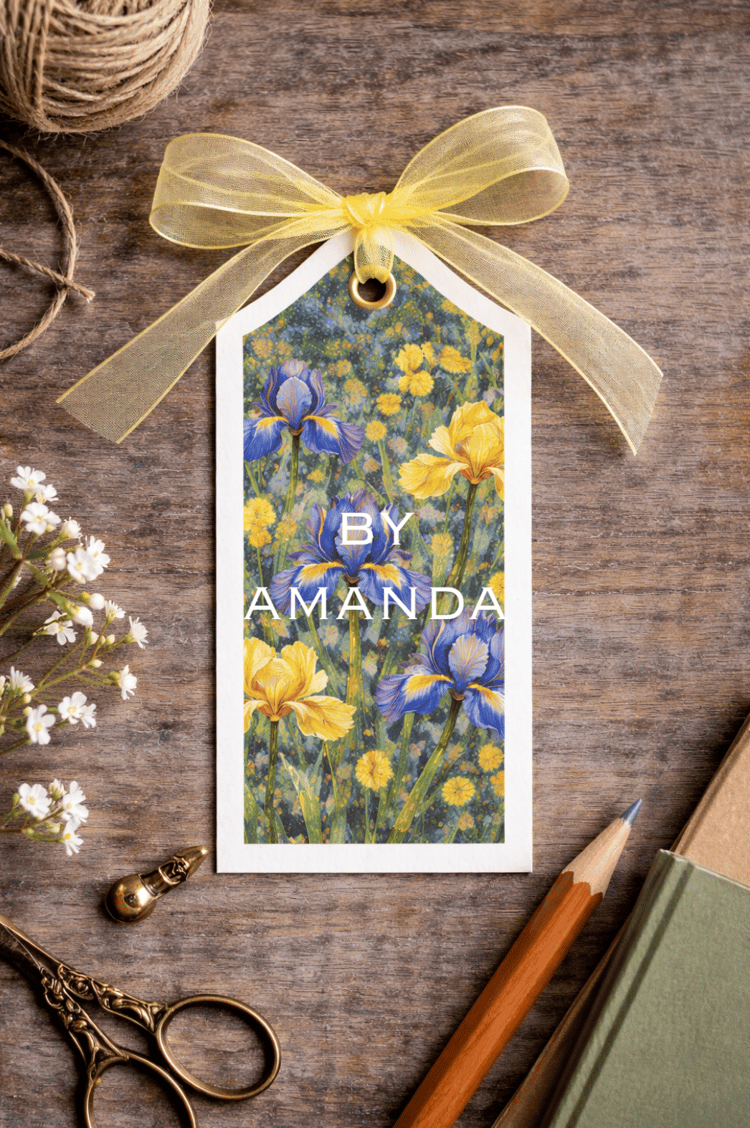
These are perfect for making your own tags and book marks and don't forget you can use your printer settings to change the % of the print - on this occasion i made the print smaller to use on the tag and bookmark
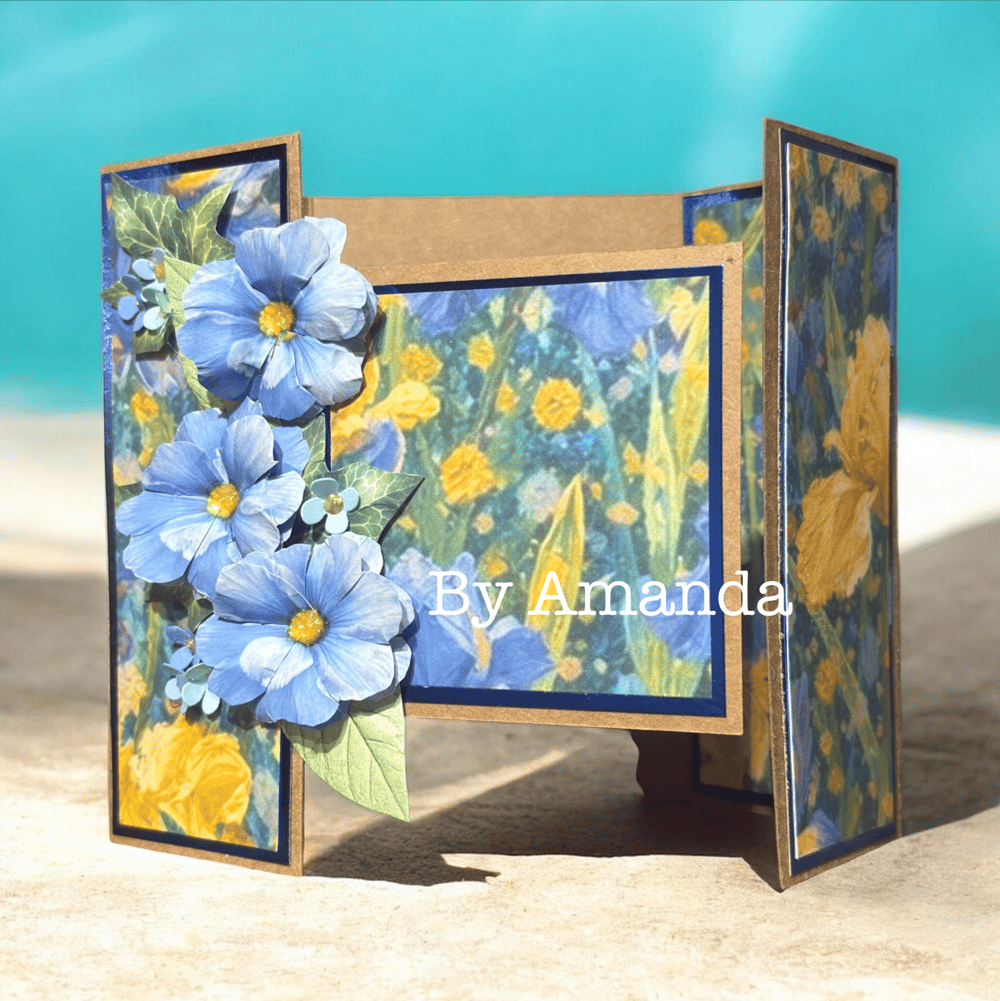
I used some of the New Single Printable Rose leaves - you can find these here: https://shop.obyd.co.uk/b/acuPM
and some of my favourite Woodland Printable ivy leaves - you can find these here:
https://shop.obyd.co.uk/b/8slFt
The handmade Blue flowers are from the Iris Kit, i cut these out and shaped them with my ball tool and foam mat
I added some small die cut flowers - these are the Spellbinders Lilac flowers
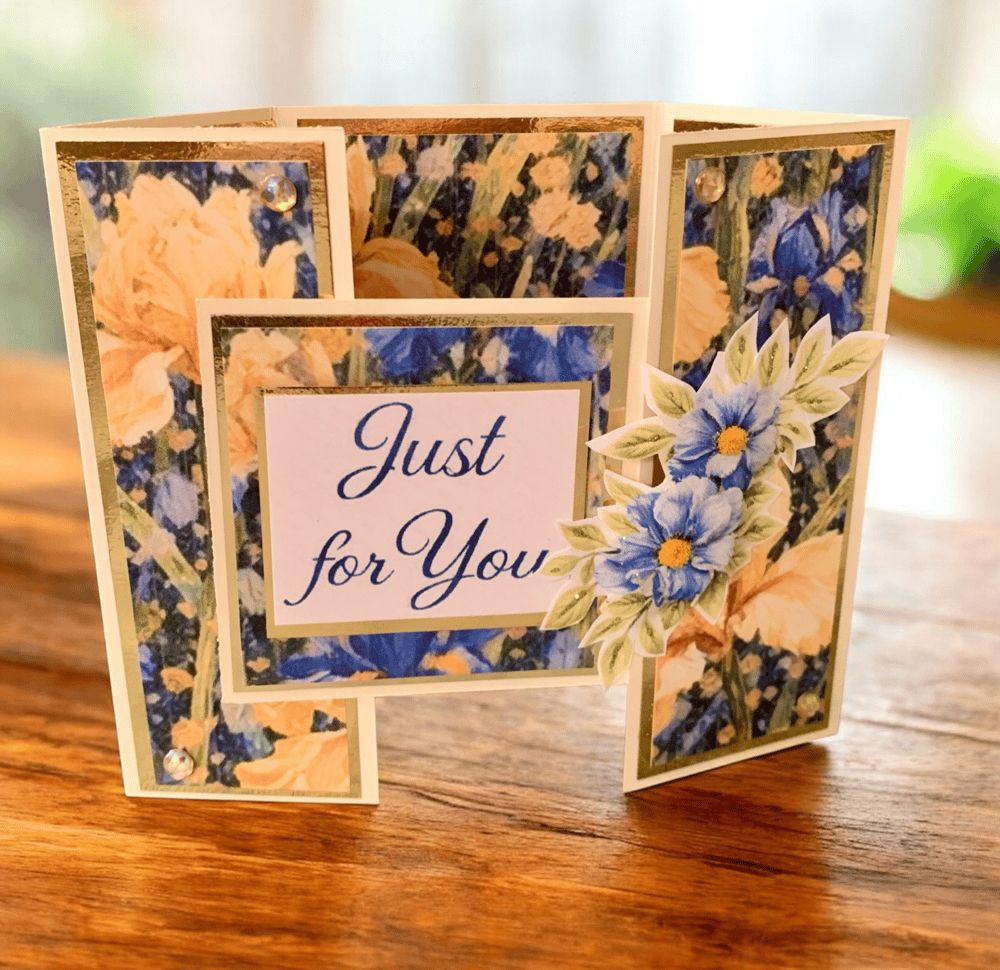
This is Laura's beautiful card made using the kit, she followed the instructions to complete the fold then decorated it with the Iris Papers. She used the Fussy Cut Embellishments sheet and one of the sentiments from the kit
Stickles was used on the leaves to add some sparkle
Gems were added to finish the card
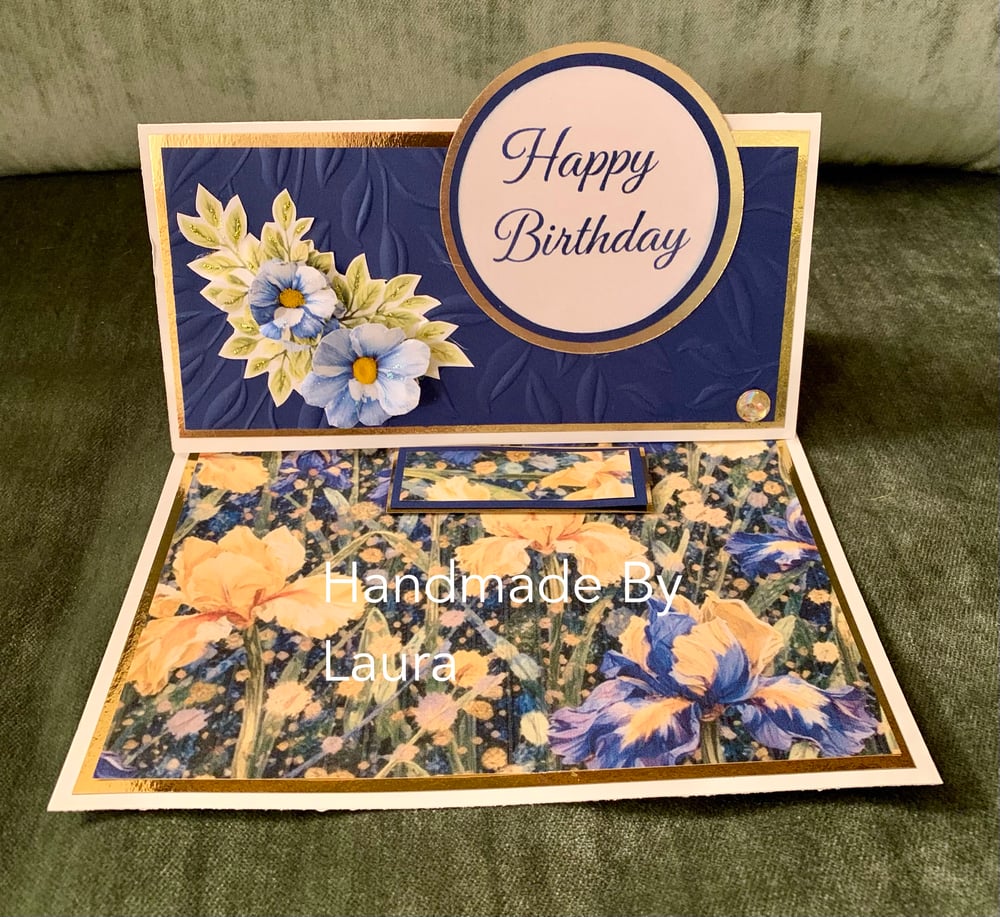
Sharing Laura's Easel Card the above photo is the card open and the below photo is the card closed
The iris papers were used to decorate the card along with some embossed card panels
The flowers, foliage and sentiment are all from the Iris Kit
I am very much looking forward to seeing what you create with it. If you make something using the Iris Kit, please do share it — seeing your finished projects is always the most rewarding part of any launch.
Happy crafting,
Amanda xo
Looking for a little more creative inspiration?
If you’re enjoying the journey so far and feel like exploring a bit deeper, I’d love to welcome you across some of our other crafty spaces. Whether you're here for the inspiration, the community, or just a quiet moment to create, there's something waiting for you.
🎨 Facebook Group – A lovely, welcoming community full of inspiration and crafty chats:
💖 Facebook Page – Stay up to date with launches, lives, and special offers:
📝 Crafty Blog – Behind-the-scenes, tutorials, and updates:
🛒 Download Shop – Packed with digital papers, sentiments, and more:
🌐 Main Website – Explore everything Opulence by Design:
Instagram - Give me a follow for lots of info - https://www.instagram.com/opulencebydesignca/
📚 Amazon – For my Cut & Craft printed books and kits (great for those who love physical items!):
👉 Check out all of my books here on amazon
📌 Pinterest – I’ve been busy adding card samples and inspiration to my boards!
It would mean the world if you could pop over, have a peek, and give me a follow 💕
👉 Check Out My Pinterest Boards
And for everything in one place, all of our socials are right here:
Comments
Post a Comment