Elegant Pansy Bouquet Card - Florist’s Top Tips for Crafting Realistic Paper Pansies & Arranging Them Beautifully on your crafty makes: Blog Post
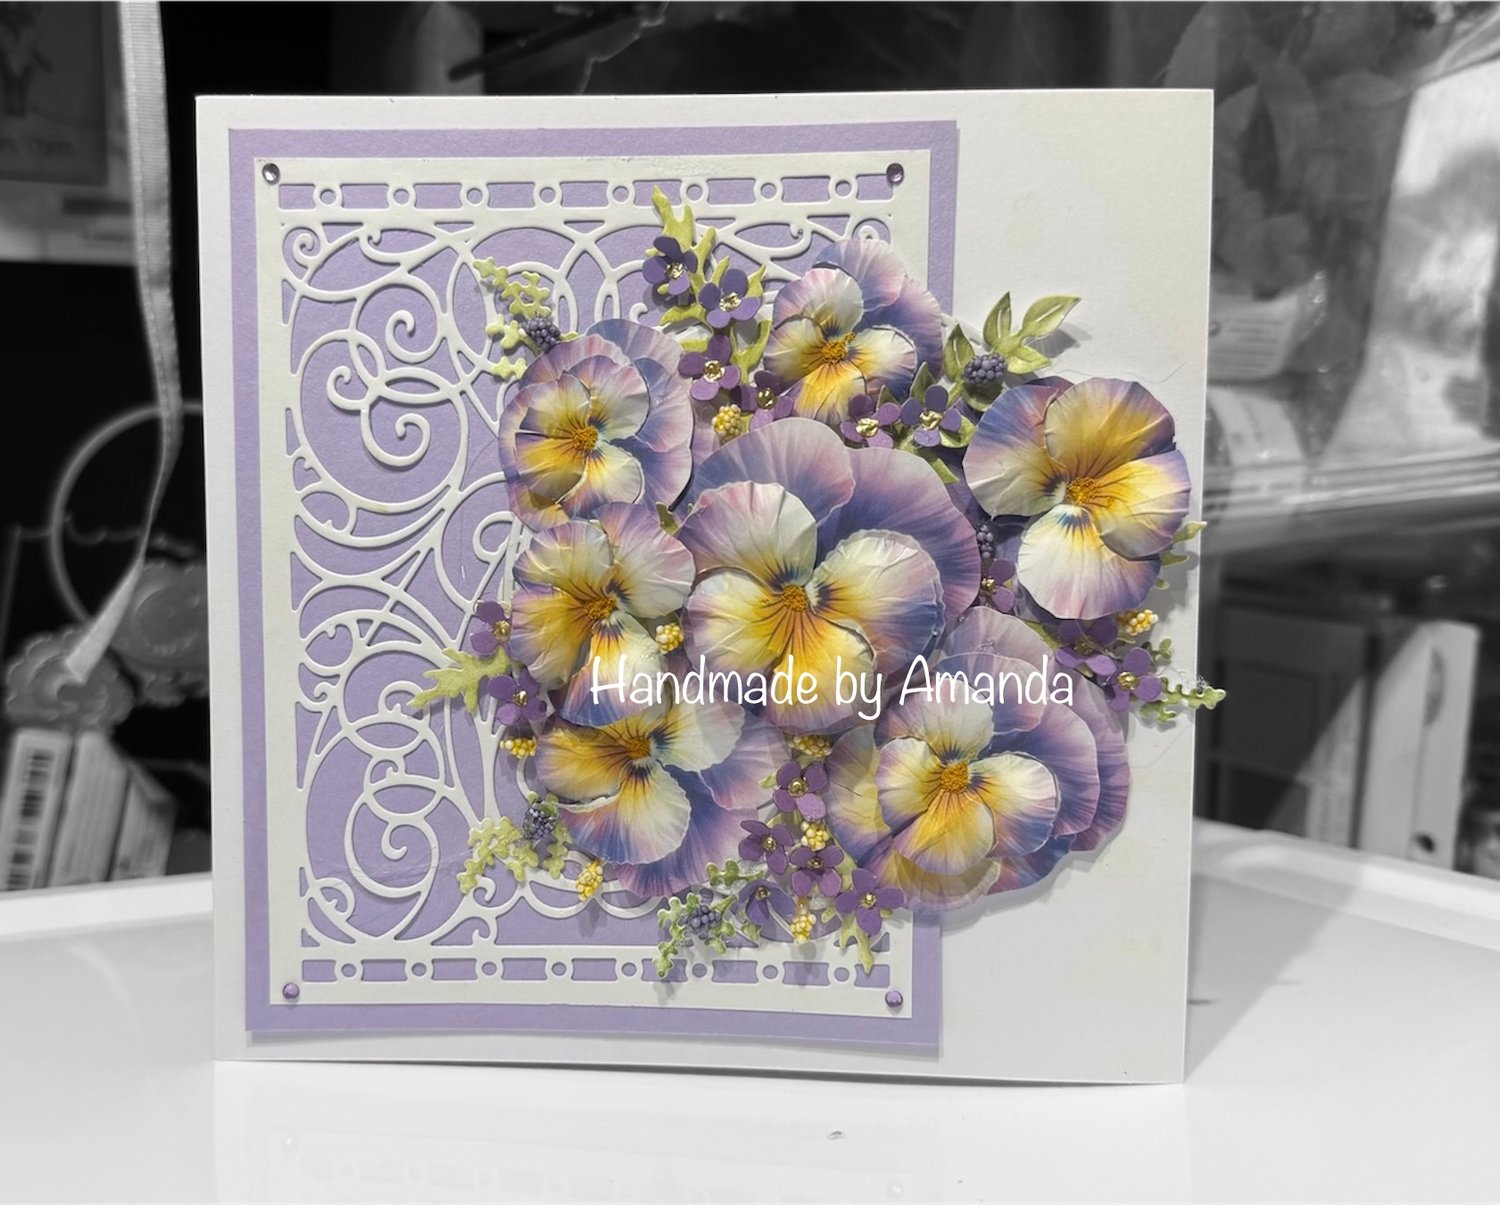
Elegant Pansy Bouquet Card - Florist’s Top Tips for Crafting Realistic Paper Pansies & Arranging Them Beautifully on your crafty makes: Blog Post
Happy Wednesday – Sunshine, Pansies & Plenty of Crafting Joy!
Good morning lovely crafters!
I hope you’re having a great start to your Wednesday — it’s absolutely beautiful here today with bright blue skies and sunshine beaming through the window. I’ve been up for a few hours already and it’s been a busy (but lovely) morning. There’s a lot going on today — I’m finishing off a fun new project for you, prepping for my Canada session this evening, and working on a new book that I’m so excited to share soon!
Before we dive into today’s crafty inspiration, I just wanted to say thank you if you checked out yesterday’s blog project— I had so many kind comments! If you missed it, don’t worry, I’ll leave the link Print, Cut & Form range of flowers and leaves — perfect for adding beautiful, realistic florals to your projects without needing a die cutting machine. I adore the detail in the printed designs, and as someone who genuinely enjoys fussy cutting, there’s nothing better than a relaxing evening with your feet up, a cuppa in hand, binge-watching your favourite show while cutting out flowers for your next creative make
You can find the full range of printable flowers and leaves on the website here


Supplies List for the Pansy Card Project
(Links are both from my website and amazon affiliate links where available — as an Amazon Associate, I may earn a small commission on qualifying purchases, at no cost to you. Thank you for supporting my blog!)
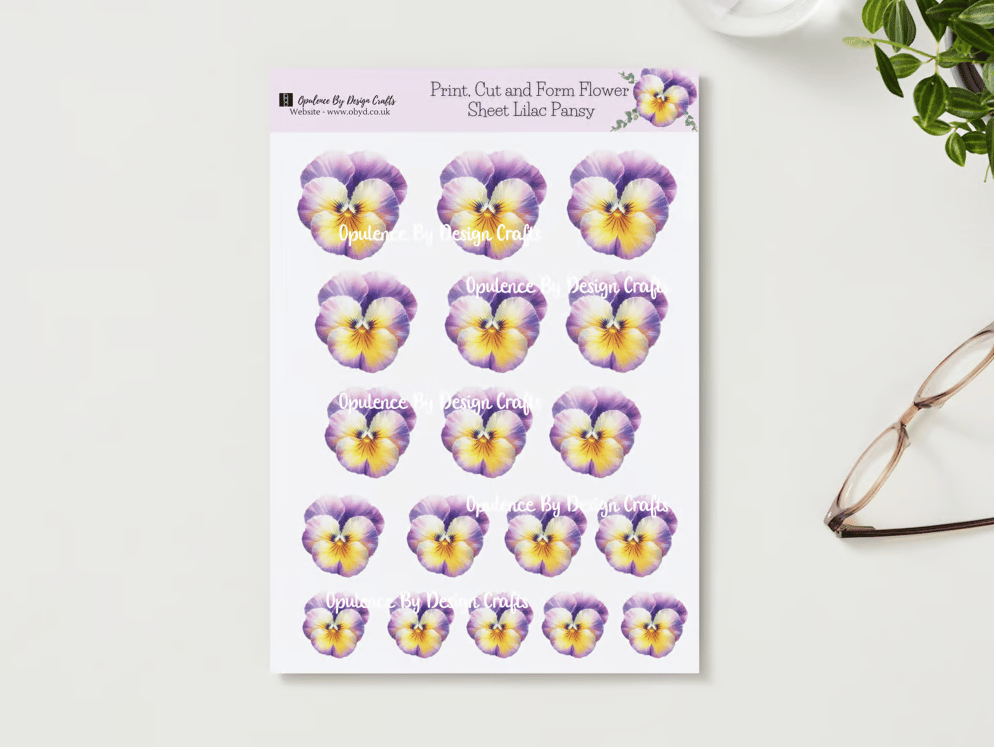
- The flowers on the card are from my - Print, Cut and form Pansy Sheet digital download - you can find it here on the website - https://shop.obyd.co.uk/b/Jg5ak
- 7x7 Card Blank – A great size for showing off your floral arrangements - https://amzn.to/42Kn4cM
- Spellbinders A2 Swirl Die – This is an older die but creates a beautiful lacy base sadly this is no longer available on amazon.
- Lilac Cardstock or Paper – For matting and layering under your focal design
- 160gsm Super Smooth Card – Perfect for printing detailed flower sheets - https://amzn.to/4d3gstn
- Snips/Scissors – I used my new Tim Holtz snips - https://amzn.to/43iCZz5
- Foam Mat and Ball Tool – To shape the pansies and filler flowers
- Ball tool - https://amzn.to/4iNiAqn
- Foam Mat - https://amzn.to/4m0gO8t
- OR Spellbinders Tool 'n One Set (A complete set for foam mat, ball tool and shaping tools plus tweezers) – Helpful for placing tiny pieces and shaping your flowers all in one tool set - https://amzn.to/3F5reTn
- Pollen for Flower Centres – Adds a realistic finish to your blooms - https://amzn.to/432Md13
you can see the pollen more clearly here:
- Foliage Dies – Use a mix to create depth and structure - i went through my stash and picked all delicate little foliage sprigs for this
- Small Flower Die or Punch – For the lilac filler flowers - https://amzn.to/4mbR359
- Liquid Pearls – Used in the centres of the tiny flowers - https://amzn.to/4dfNLd2
- Berry Stamens – I used yellow and purple to match the pansies
- Purple - https://amzn.to/4m5FhZN
- Yellow - https://amzn.to/43iZ9kM
- Adhesive (Wet Glue / Hot Glue) – For assembling your floral arrangement
- Gems or Pearls – A touch of sparkle to finish your card
- Optional Sentiment
Pansy Flower Card – Step-by-Step Instructions
1. Prepare the Card Base
Start with a 7x7 card blank as your base.
Choose a soft, coordinating lilac cardstock or decorative paper to mat and layer onto the front of the card. Trim this layer slightly smaller than the card front and adhere it in place. As i am using a square card and the die is very decorative and rectangle i chose to place this to one side so the arrangement so not to hide too much of the decoration from the die.
2. Die Cut the Decorative Base
Using the Spellbinders A2 Swirl die (or similar), cut a decorative base layer from white or matching cardstock. This will act as your elegant frame to build the floral arrangement onto. Attach this onto the lilac mat layer using glue or double-sided tape. I have been using this a long time and i know some of my group members have bought this from previous blog posts so i thought it would be nice to use it again.
If you don't have anything similar you could use and embossed panel or just some pretty paper.
3. Print and Cut Your Flowers
Print the Pansy Flower Sheet onto 160gsm super smooth cardstock for crisp, vibrant results. Carefully cut out the pansies using your favourite snips or scissors.
- The larger pansies are made using two layers
- The smaller pansies can be used as single-layer flowers.
why 160gsm? this is personal preference for me you can certainly print onto a higher gsm but i find this a bit tough going when doing a lot of cutting out. Anything lighter can tend to get squished easier and as most of my cards are presented in boxes 160gsm is perfect for me - easy to cut out and holds its shape.
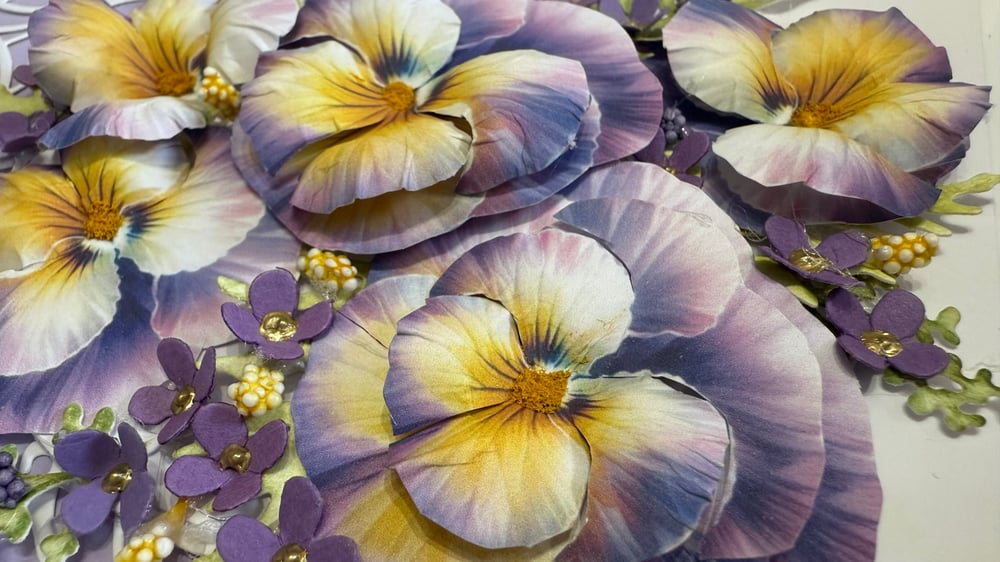
4. Shape the Flowers
Use a foam mat and ball tool to gently shape each petal.
1.) Cut out your flower making sure to leave no white around the outside of the flower
2.) Slightly snip into your flower along the edge of the petals to give you more surface area to work with - be careful not to snip too far as you petals may tear when using your ball tool.
3.) Turn your flower over so you are working on the white side
4.) Starting at the edge of each petal, roll the tool around the petal and towards the centre of the flower to give it dimension and a realistic curve.
I have the Spellbinders tool set which i absolutely love.. i was so pleased with it i bought one for Laura and she loves it too. If you are new to flower making i listed my ball tool from Tonic and Mat from Pinflair that i have used for over 12 years until i decided to make the plunge and upgrade to get the Spellbinders tool set.
In my humble opinion - you get what you pay for. The tool set is amazing. I love all of the extra detail i get on my flowers and leaves that just isn't possible with just a ball tool - especially when using thicker card. I do a lot of die cut flowers that i colour in and I really wish i had bought this years ago!
5. Add Pollen Centres
Add a small dab of wet glue to the centre of each pansy and sprinkle or press in your chosen flower pollen. This step brings your flowers to life with texture and detail.
When i use pollen on flowers i always get asked what it is as it makes the flowers look so realistic
6. Arrange and Layer the Foliage
Die cut a variety of foliage pieces using your favourite leaf dies. Colour them in. Lay these down on the decorative die cut base to create the structure of your arrangement. Don’t glue yet—this is your mock-up stage to plan the layout.
If you would like more detail on what i used to colour in you can find the links and info on yesterdays blog post here
7. Add the Pansies
Once you're happy with the foliage placement, begin gluing them down. Then layer on the pansies, placing the larger ones as focal points and tucking smaller ones in for balance.
Top tip - just like in nature, i never pop my flowers on in the same direction i find it is more natural to have them facing in different directions just like they would be growing in the garden
8. Create Filler Flowers
Die cut or punch small flowers from the same lilac paper. Shape them with your ball tool and glue them into the gaps between pansies.
Add liquid pearls to the centres for a finished look.
9. Add Berries and Embellishments
Cut and insert a few yellow and purple berry stamens into the arrangement to add texture and height. Add a few self-adhesive gems or pearls as a final flourish.
10. Leave Space for a Sentiment
If you’re unsure of the occasion, leave space at the bottom or corner to add a sentiment later. You can use a printed sentiment, die cut or even hand-stamp one when you're ready.
For more crafty inspiration check out our:
Facebook group - https://www.facebook.com/groups/672573406875861
Facebook page - https://www.facebook.com/OpulenceByDesign/
Blog - https://shop.obyd.co.uk/blog/opulence-by-design-crafty-corner-blog
Download Shop - https://shop.obyd.co.uk/
Website - www.obyd.co.uk
Amazon - Cut and Craft books - https://www.amazon.co.uk/stores/author/B0DKTBB8KQ
For all of our social media accounts you can find the links here: https://linktr.ee/opulencebydesign
If you have Pinterest i would greatly appreciate a follow as i have spent weeks adding lots of card samples to my various boards - Cardmaking ideas, Christmas crafts, My Crafty Blog board and others so it would be awesome if you could pop over and show it some love - Pinterest Boards
Thank you for looking, happy crafting as always! A xo
Comments
Post a Comment