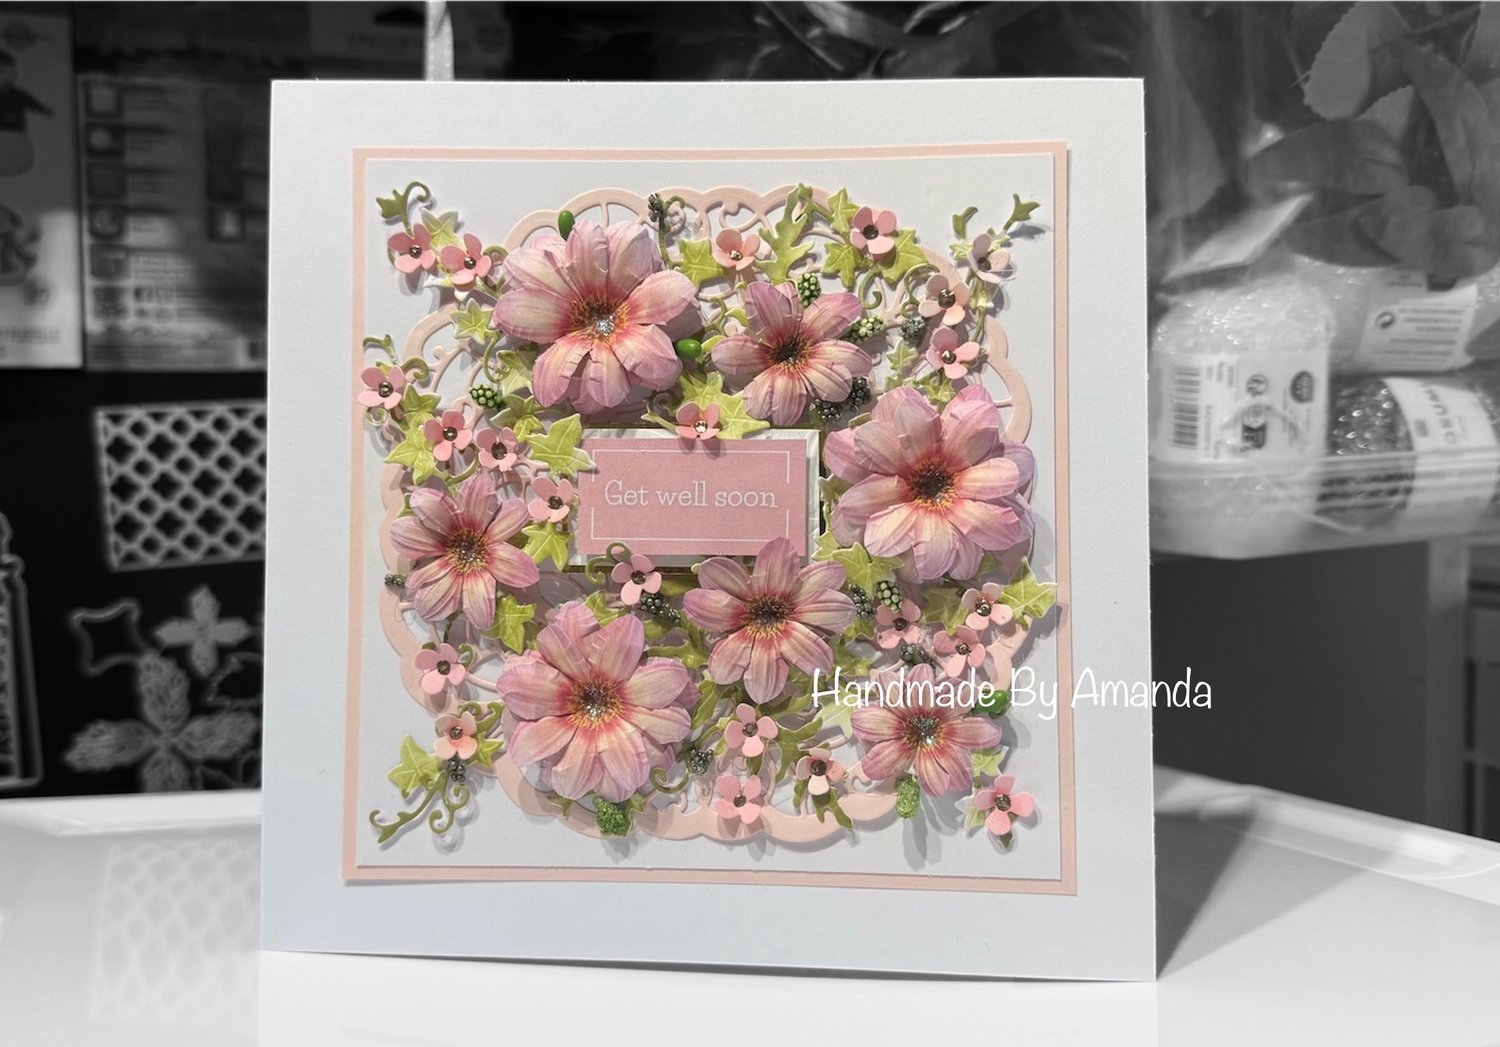
Craft Along With Me: A Beautiful Floral Card Using What’s in Your Stash
Hello Crafty Friends!
Happy Tuesday & Welcome Back!
I hope you’ve all had a truly lovely long Bank Holiday weekend. I’ve been lucky enough to enjoy a couple of restful days, catching up with family and taking a breather after my recent work trip to London — a bit of downtime was definitely needed, and now I’m feeling refreshed and ready to dive back into crafting!
Today, I’ve got a little creative project to share with you — and the best part? It’s made using older products from my stash. You might already have something very similar tucked away in yours too! So if you're in the mood to get stuck into a bit of mindful making without needing to rush off and buy something new, this one’s for you.
💡 The idea behind this project is to remind us how much magic we can still create with what we already have. Whether it’s an old topper sheet you’ve been saving for “the right moment,” leftover patterned papers, or a bunch of half-used embellishments — it’s time to bring them out and give them new life!
I’ll walk you through the project step-by-step, and I really hope it gives you some inspiration to dig through your stash and enjoy some no-pressure, joy-filled crafting.
Let me know in the comments or over in the Facebook group if you give it a go — I’d love to see your makes! 💕 if you aren't a member of our facebook group already you can find it here
Happy crafting,
Amanda x
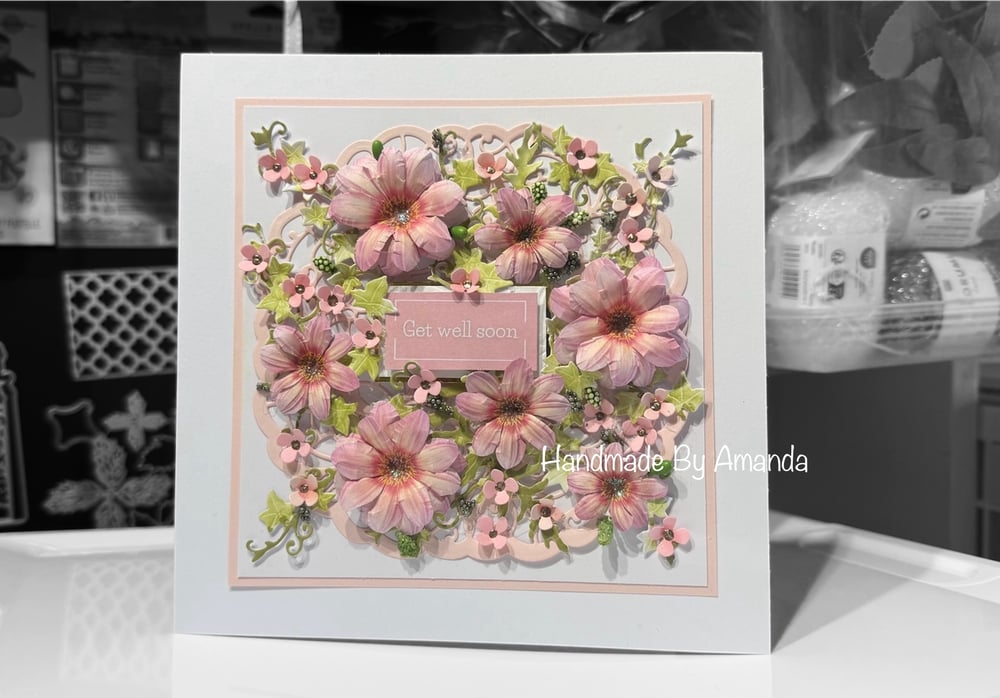
Today I’ve got a lovely project for you that’s perfect for flexing your floral arranging skills — paper style!
It’s all about beautiful dahlias, delicate ivy, and a touch of sparkle. Whether you’ve got a stash full of hidden treasures or you're just getting started, this project is for you.
Bonus — I’ve popped links below to all the supplies I used (where I could find them!). They’re all from Amazon — as an Amazon Associate, I may earn a tiny referral commission on qualifying purchases. There’s no extra cost to you, but it helps me keep bringing you new projects and inspiration. 💕
Supplies List:
You may already have similar goodies in your stash — feel free to substitute! But if you’re missing anything, I’ve got you covered:
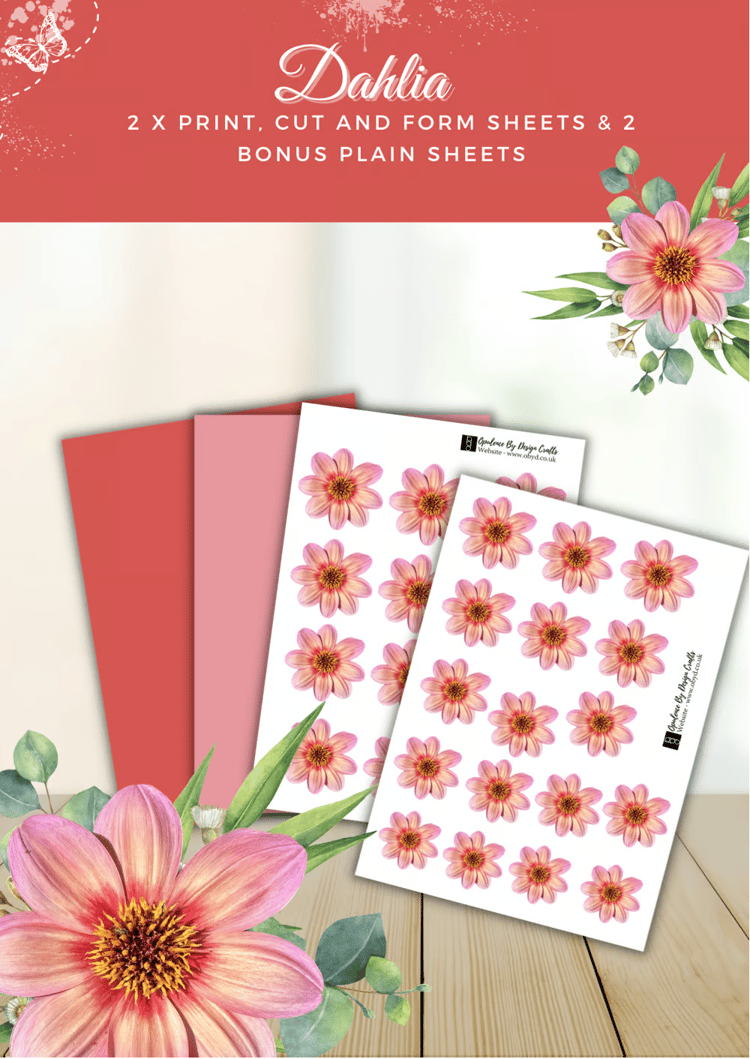
- Use your die cut flowers for this card, if you don't have anything suitable or if you liked what i used and would like to take a look you can find the Dahlia Print, Cut & Form Flowers here – https://shop.obyd.co.uk/b/6nxyu
- 7x7 Card Blank (Crafters Companion): Buy on Amazon
- Ivy Leaves Die (similar to my old Tattered Lace one): Try this one
- Frilly Decorative Base Die (Spellbinders): Buy here
- Tiny Flower Die (Spellbinders): See it here
- Fern & Ivy Die (Spellbinders): Available here
- Green Berry Stamens: Buy on Amazon
- Small Flower Punch (great alternative! if you don't have a die cutting machine or just want a convenient and quick alternative): Kid-friendly paper punch
- 160gsm Super Smooth Printing Paper – https://amzn.to/453kDDs
- A5 Foam Mat – Used for shaping flowers - https://amzn.to/3YUutEb
- Ball Tool – For shaping petals - https://amzn.to/4jGMIF9
- PanPastel (Green) – Used for colouring ivy leaves - https://amzn.to/3EHjF5o
- Make-up Applicators – Used for applying ink or PanPastel - the ones i use are from Home Bargains but if you dont have one near you, you can pick up something similar on amazon here: https://amzn.to/3F0ytvO
- White Cardstock – For matting and layering - https://amzn.to/4373fve
- Gold Mirror Card – For matting under the sentiment - https://amzn.to/42YoAH2 (great price for just using for matting and layering!!)
- Sentiment Stash – Could link to a printable sentiment sheet if you have one.
- Hot Glue Gun – Used to secure the florals there are loads to choose from on amazon
- Ink Pad – For colouring the filler flowers i like the little ink pads, they are so inexpensive so it means you can buy more colours!
- Ranger Liquid Pearls – https://amzn.to/4iSRXRd
- 160gsm Super Smooth Printing Paper – Great for crisp, clean printing yet strong enough to handle the shaping of the ball tool - https://amzn.to/453kDDs
- A5 Foam Mat – Perfect for shaping flowers - https://amzn.to/3YUutEb
- Ball Tool – Gives lovely dimension to flower petals - mine is old and orange the newer ones are blue https://amzn.to/4jGMIF9
- PanPastel (Green) – Used to softly colour the ivy leaves https://amzn.to/3EHjF5o
- Make-up Applicators – I normally get mine from Home Bargains, but here’s a good option online
- White Cardstock – Ideal for matting and layering - https://amzn.to/4373fve
- Gold Mirror Card – Adds a beautiful touch of shimmer - https://amzn.to/42YoAH2 (Really affordable for using just as a matting layer!)
- Sentiment Stash – I used one from a previous project, but you could use your own or check out my printable sentiment sheets
- Hot Glue Gun – Great for securely attaching florals (There are lots of options on Amazon depending on what you prefer)
- Ink Pad – I like using mini ink pads for colouring small elements. They're really affordable and easy to store
- Ranger Liquid Pearls – Perfect for finishing touches like flower centres - https://amzn.to/4iSRXRd
- Yellow stickles for the centre of the Dahlias - https://amzn.to/4m7snL6 - i love using this in the centres of flowers for that added touch of sparkle
🧡 Step-by-Step Instructions:
Create the Base
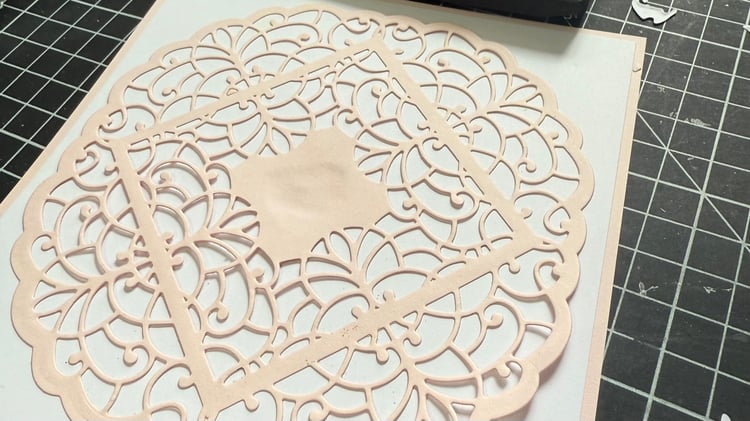
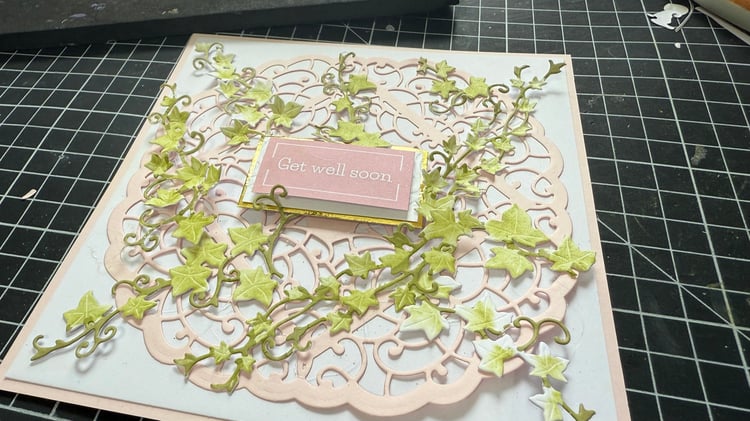
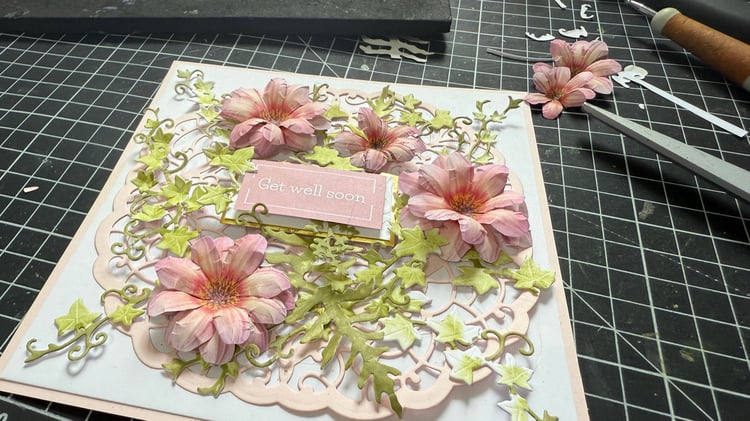
Die cut the decorative frilly base on soft pink cardstock, then mat and layer onto white cardstock for a fresh, clean background.
Prep the Dahlias
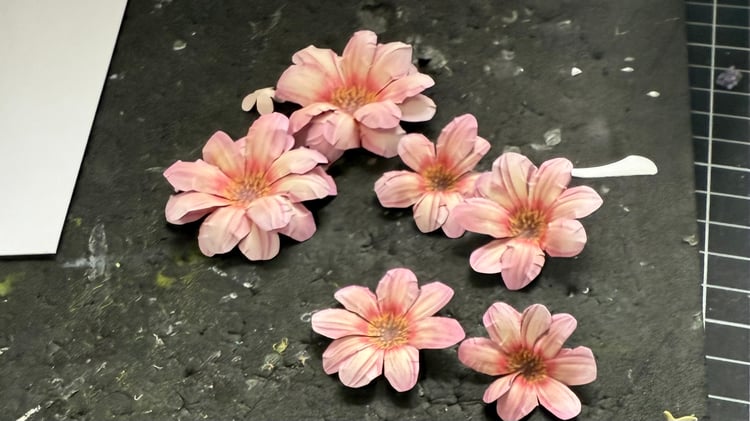
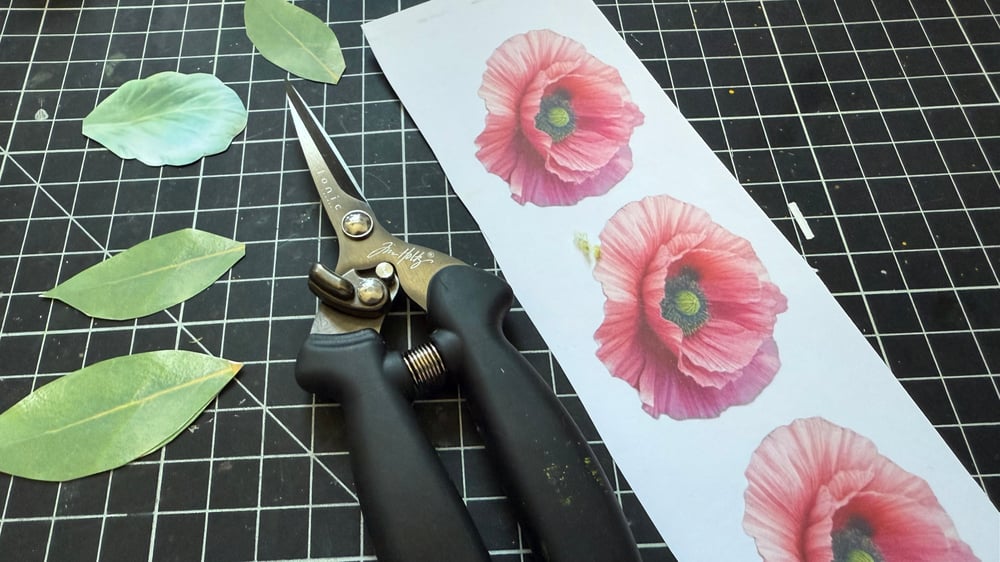
Print the dahlia sheet onto 160gsm super smooth paper. Cut them out with snips and gently clip towards the centre of each flower to allow for shaping.
➡️ New to flower forming? Check out this quick video tutorial using the same method: Watch here
Top Tip!!! If you love cutting out - check out my new Tim Holtz by Tonic Studios snips - they make cutting out a dream and are really easy on your hands. They have the same mechanism as my old Martha Stewart ones which are bit past it lol!! Well i have been using them for 7 years and were starting to look a little tatty!
I posted about these on fb last week and i know a few of you have bought them
You can find them here: https://amzn.to/4jE8GbT
You need to check out the price on these!! Time sensitive so don't miss out!!
They even come with a spare spring
Shape & Colour
Use a ball tool and foam mat to shape your petals.
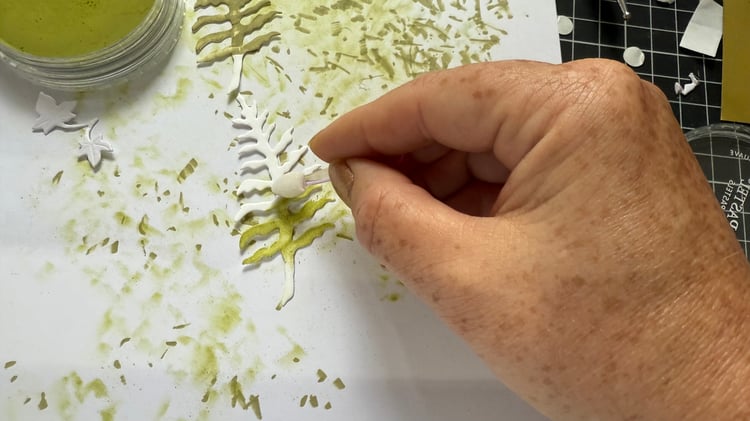
Die cut or punch out your foliage and gently colour with green PanPastel using a little makeup sponge.
Add the Sentiment
Choose a sentiment from your stash. I layered mine with white and gold mirror card and raised it using foam pads for a touch of dimension.
Start Arranging
Begin with your greenery — just like real flower arranging! Add your leaves and ferns to form a structure. Once you're happy with the flow, start placing your dahlias.
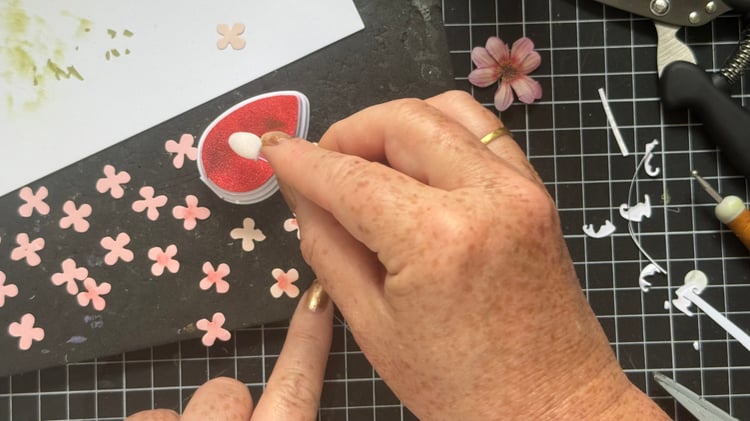
Add Filler Flowers
Die cut or punch tiny blooms and shade with your ink pad and sponge for a realistic, varied look. Nestle them into your design and add a dab of liquid pearls to each centre for that perfect little pop.
Finishing Touches
Cut up your stamen berry picks and tuck them in between the florals for texture and interest — they’re one of my secret go-to's!
Add a few more leaves here and there to complete the lush, natural look
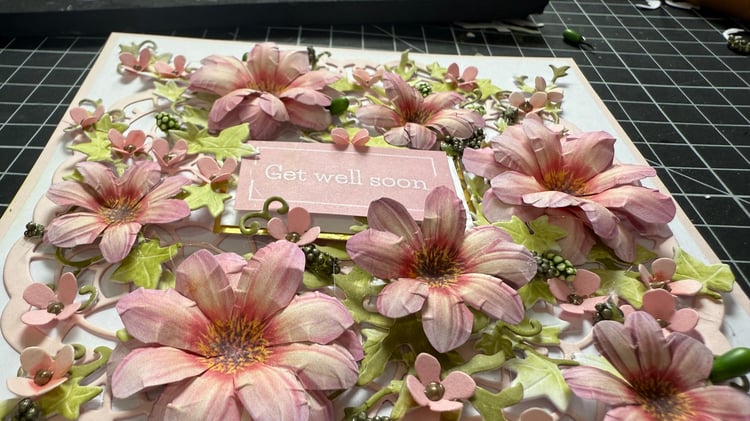
This card is full of detail and dimension — and it’s such a joy to create! Whether you’re crafting for a birthday, thinking of you, or just because, it’s a beautiful handmade piece from the heart.
I really hope this inspires you to pull out some old stash items and give them new life 💛
Let me know if you try it — tag me on social or share your makes in the group, I LOVE seeing what you do!
For more crafty inspiration check out our:
Facebook group - https://www.facebook.com/groups/672573406875861
Facebook page - https://www.facebook.com/OpulenceByDesign/
Blog - https://shop.obyd.co.uk/blog/opulence-by-design-crafty-corner-blog
Download Shop - https://shop.obyd.co.uk/
Website - www.obyd.co.uk
Amazon - Cut and Craft books - https://www.amazon.co.uk/stores/author/B0DKTBB8KQ
For all of our social media accounts you can find the links here: https://linktr.ee/opulencebydesign
If you have Pinterest i would greatly appreciate a follow as i have spent weeks adding lots of card samples to my various boards - Cardmaking ideas, Christmas crafts, My Crafty Blog board and others so it would be awesome if you could pop over and show it some love - Pinterest Boards
Thank you for looking, happy crafting as always! A xo
Comments
Post a Comment