Spin Into Spring! Create a Stunning Lily of the Valley Spinner Card with Our New Digital Paper Pack - Full Step by Step Instructions and Supplies List
Spin Into Spring! Create a Stunning Lily of the Valley Spinner Card with Our New Digital Paper Pack - Full Step by Step Instructions and Supplies List
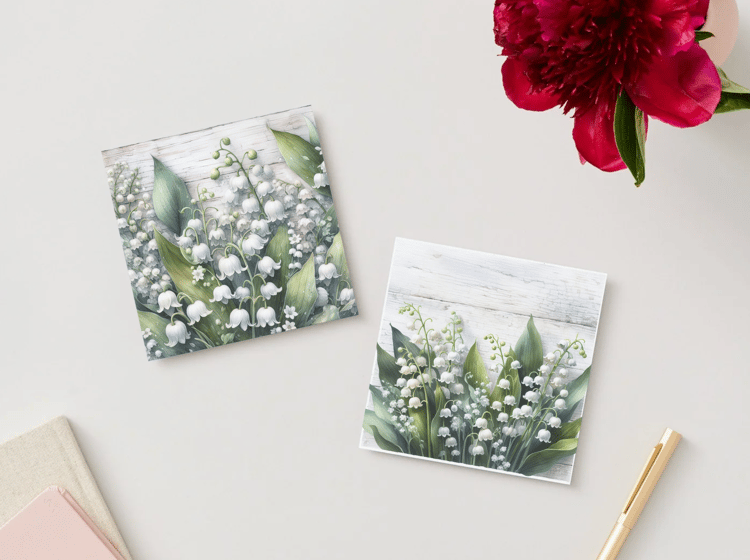
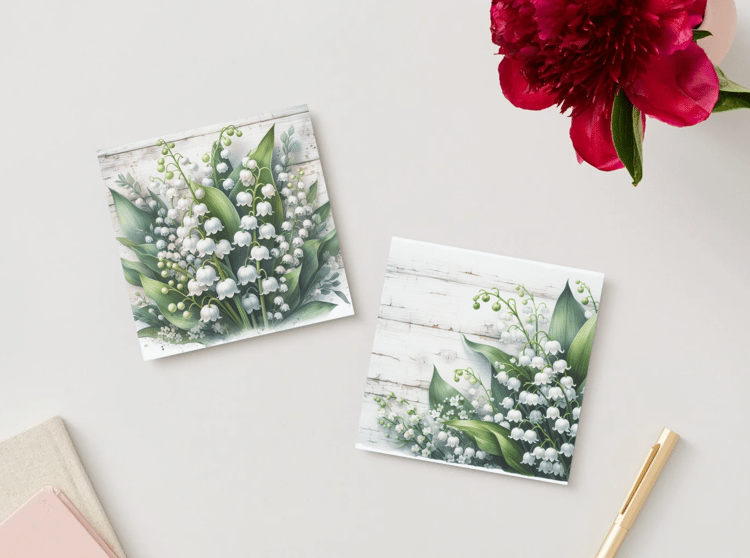
🌿 Introducing the Paper Addicts Bold Botanicals - Lily of the Valley 8x8 Paper Pack PDF Digital Download! 🌿
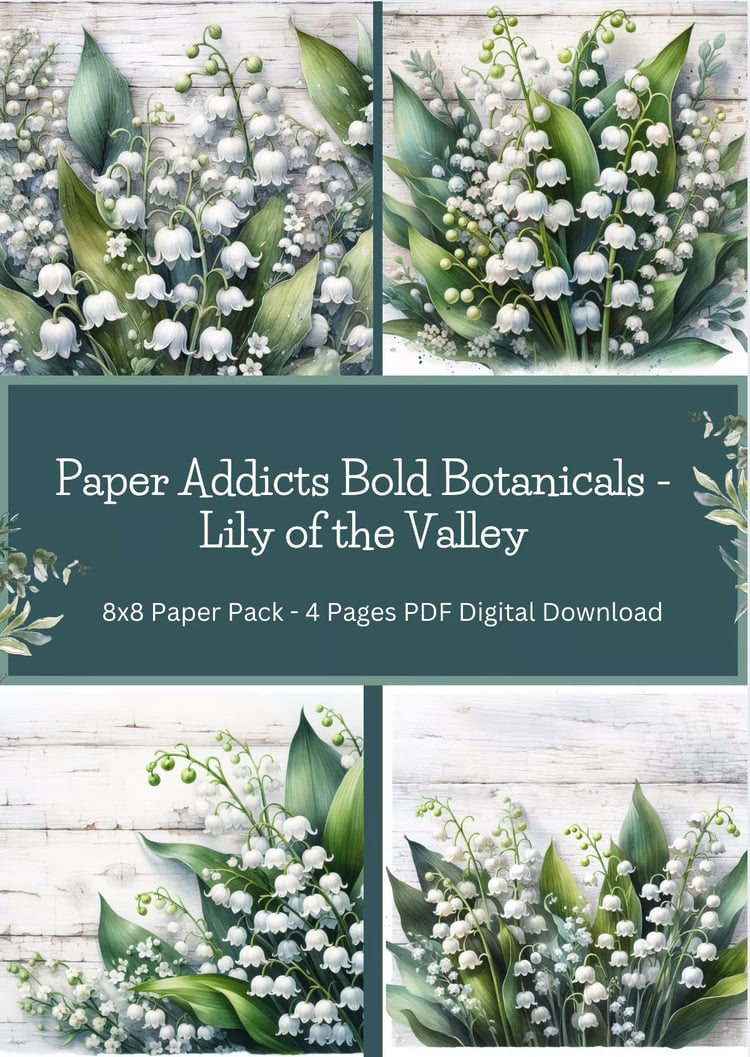
You can find it on the website here: https://shop.obyd.co.uk/b/2NTHh
If you love delicate florals and timeless elegance, this stunning Lily of the Valley paper pack is perfect for your crafting projects! Available as an instant digital download, you can start creating beautiful cards, scrapbook pages, and more right away—no waiting for shipping!
Why Choose Digital Downloads?
- Instant Access – Download and craft immediately!
- Unlimited Printing – Print as many times as you like to make your cards and projects. You may sell your handmade cards and projects made with my designs - see listing for full Angel Policy
- Cost-Effective & Eco-Friendly – No shipping fees, no waste!
- Versatile & Customisable – Resize using your printer settings or printer app to fit your projects, you can also cut into the sheets to make your own toppers. Use with your dies and shape cutters
- Use on Multiple Materials – Print on cardstock, vellum, acetate, printable fabric or sticker paper.
- This pack features beautiful, high-quality floral designs that are perfect for cardmaking, scrapbooking, journaling, and more!
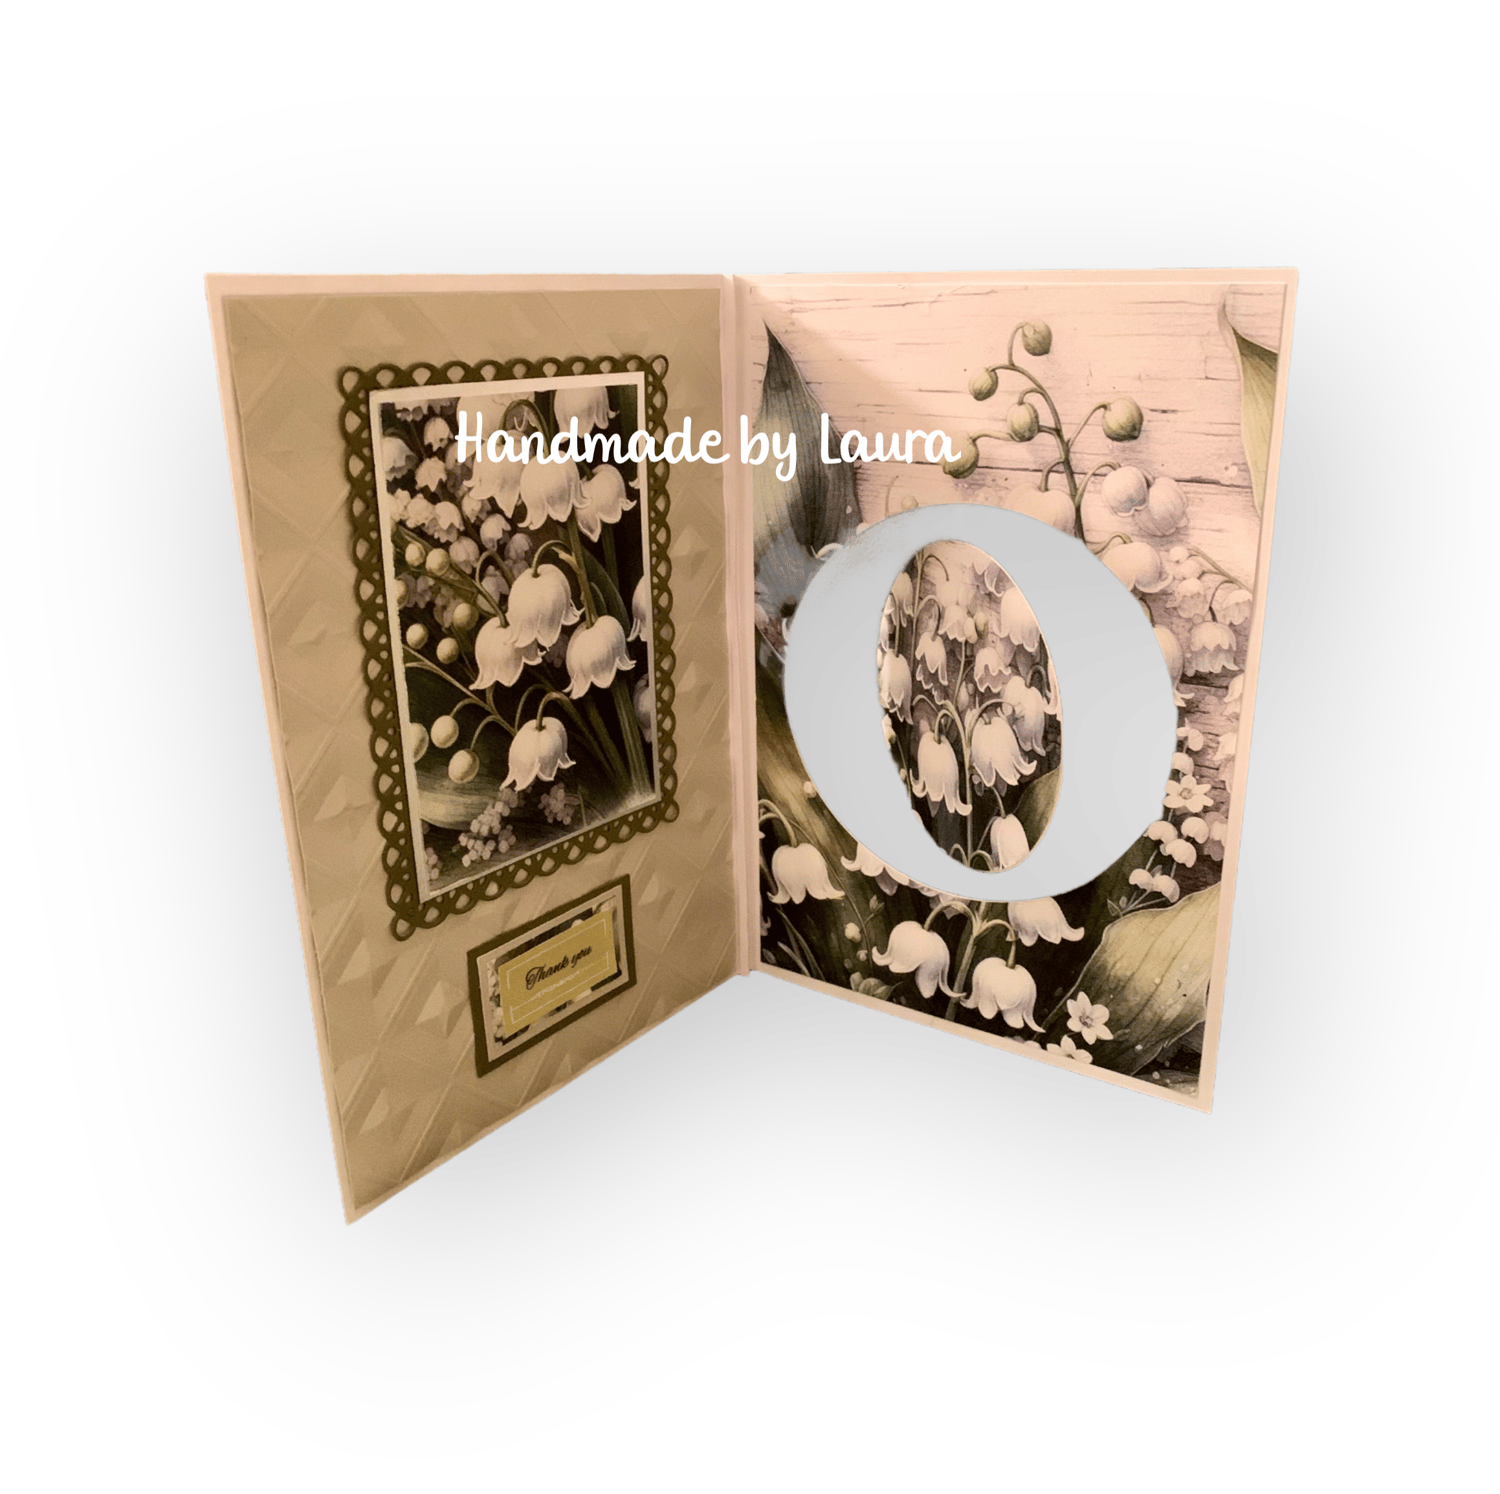
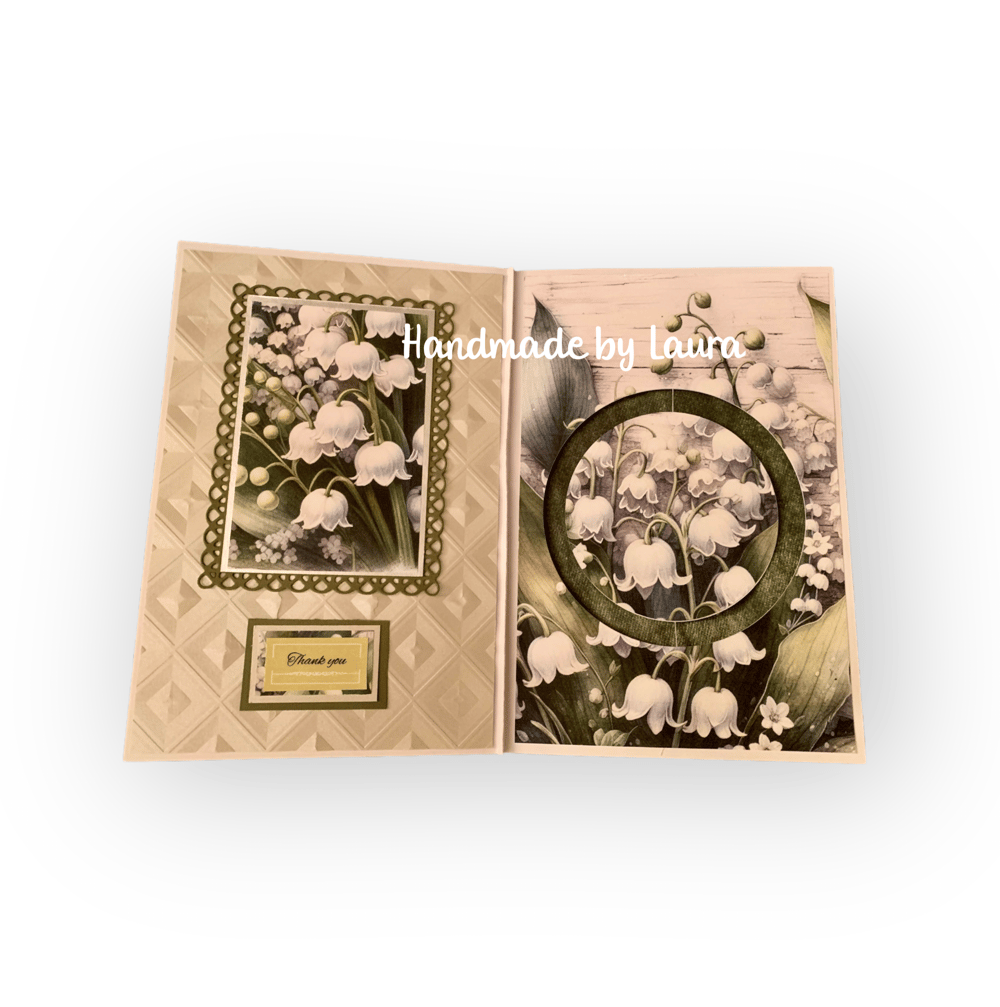
This is the sample card made for the launch

Step-by-Step Instructions for an A5 Portrait Spinner Card
This stunning A5 Portrait Spinner Card features a circular spinning element on the right-hand panel of the open card, hidden mechanics, a beautiful embossed background, and a Lily of the Valley-themed focal point. Follow these instructions to create your own!
I have been asked for this tutorial so many times but it one of those that you need to sit and do one to write the instructions and as you can imagine things have been a little manic lately!
This is such a fun card to make and it is always a nice surprise for the recipient to open the card with a kinetic action
** Disclosure: As an Amazon Associate, I may earn a small commission if you make a purchase through my UK Amazon affiliate links. This comes at no extra cost to you but helps support my work.
Supplies You’ll Need:
A4 Cardstock (for base) – 300gsm for a sturdy card - https://amzn.to/4bLRvSF
Printing paper for the papers - amazing price for 250 sheets - https://amzn.to/3R0vTIz
Card for embossing
Sentiment - this one is from one of our recent kits
Lily of the Valley Paper – for background and topper - https://shop.obyd.co.uk/b/2NTHh
Circle Dies – to create the aperture - https://amzn.to/4bM2wTS
Spellbinders Embossing Folder – for the right-hand panel texture - https://amzn.to/4bM2wTS
Die-Cutting Machine – to emboss and cut circles
White / Cream Thread or Clear Fishing Line – for the spinner mechanism this is the invisible thread we use - https://amzn.to/3Doibwf
Sellotape
Tape Pens for a Strong Adhesive hold – to secure layers - https://amzn.to/3FlSHjA
Foam Pads – for dimension for your sentiment and topper - 1mm will be fine - this is a great mixed pack - https://amzn.to/4kIh6A0
Bone Folder – for scoring and folding - https://amzn.to/3DMVBgG
Scoreboard - optional but helpful this is the one i use - https://amzn.to/3R0sjy7
Step 1: Create the Card Base
Take an A4 piece of cardstock and score it in half at 14.8cm to create an A5 portrait-fold card.
Crease the fold well using a bone folder to ensure a crisp fold OR If you have a scoreboard use that to give you a nice score line
Step 2: Cutting the Spinner Aperture
Open the card and lay it flat. On the right-hand panel, measure and position your circle die where you want the spinning element to be.
Use a die-cutting machine to cut out the circle, making sure it’s centred properly. This will be your spinner window.
***** Top Tip - If you aren't confident with measuring you can cut your thin layer of backing paper at the same time so you windows line up instead of doing step 4 as a separate step but you might need to do an extra pass on your machine to make sure it cuts perfectly through multiple layers
I left the background on the photo below so you could see the thread in the aperture
Step 3: Preparing the Spinner Mechanism
Cut a small piece of thread or clear fishing line slightly longer than the diameter of your circle and enough to secure your threaded spinner to the card above the aperture and below.
Secure the thread at the top and bottom of the aperture using strong sellotape. Pull it tight so the spinning piece stays in place and is taught. It wont spin if the thread isn't taught.
Step 4: Creating the Decorative Cover
Take your Lily of the Valley Paper and cut a panel to exactly cover the right-hand side of the card (approx. 10.5cm x 14.8cm).
Using the same circle die, cut a matching aperture in the decorative panel so it aligns perfectly with the aperture on the card base.
Attach this panel over the spinner mechanics, concealing the thread and giving a neat finish.
Step 5: Embossing the left Panel
Take a piece of coordinating cardstock and emboss it using your chosen embossing folder.
Trim this embossed piece to fit the left side of the open card to add texture and elegance.
Adhere it neatly, leaving a slight border if desired for contrast.
Step 6: Creating the Focal Topper
Use Lily of the Valley Paper to create a layered topper. This could be a floral design, a sentiment, or a die-cut shape.
Mount the topper onto foam pads for extra dimension and place it on the right-hand panel as the main feature.
Step 7: Assembling the Spinner Element
Die cut a piece in this case a smaller circle than the aperture to use as your spinner.
Die-cut or punch 2 small images, sentiment, or decorative shape to cover each side of the spinning piece.
Stick one side of your element onto the thread inside the aperture, ensuring it’s centred and spins freely.
Attach another identical piece on the reverse for a double-sided design.
Step 8: Final Touches
Check that the spinner rotates smoothly when you twist it slightly.
Add any final embellishments, such as gems, sentiment, pearls, or ribbon, to complete your design.
Don't forget - Twist the spinner before closing the card—when the recipient opens it, the element will spin magically!
Your Beautiful Spinner Card is Complete!
Now you have a gorgeous A5 portrait spinner card, featuring a hidden thread mechanism, embossed details, and a Lily of the Valley focal point. This interactive card is sure to impress!
Would love to see your versions—happy crafting!
I hope you have liked this little project that Laura and i have put together for you - it was a fun one!!
Thank you for reading xo
Facebook group -  https://www.facebook.com/groups/672573406875861
Facebook page - https://www.facebook.com/OpulenceByDesign/
Blog - https://shop.obyd.co.uk/blog/opulence-by-design-crafty-corner-blog
Download Shop - https://shop.obyd.co.uk/
Website - www.obyd.co.uk
Amazon - my cut and craft printed kit / books for those that prefer a physical item to craft with rather than download - Cut and Craft books
For all of our social media accounts you can find the links here: https://linktr.ee/opulencebydesign
If you have Pinterest i would greatly appreciate a follow as i have spent weeks adding lots of card samples to my various boards - Cardmaking ideas, Christmas crafts, My Crafty Blog board and others so it would be awesome if you could pop over and show it some love - Pinterest Boards
Comments
Post a Comment