The Cottage Collection Handmade Card - With full supplies list - silk flowers, berries and lots of lovely dies
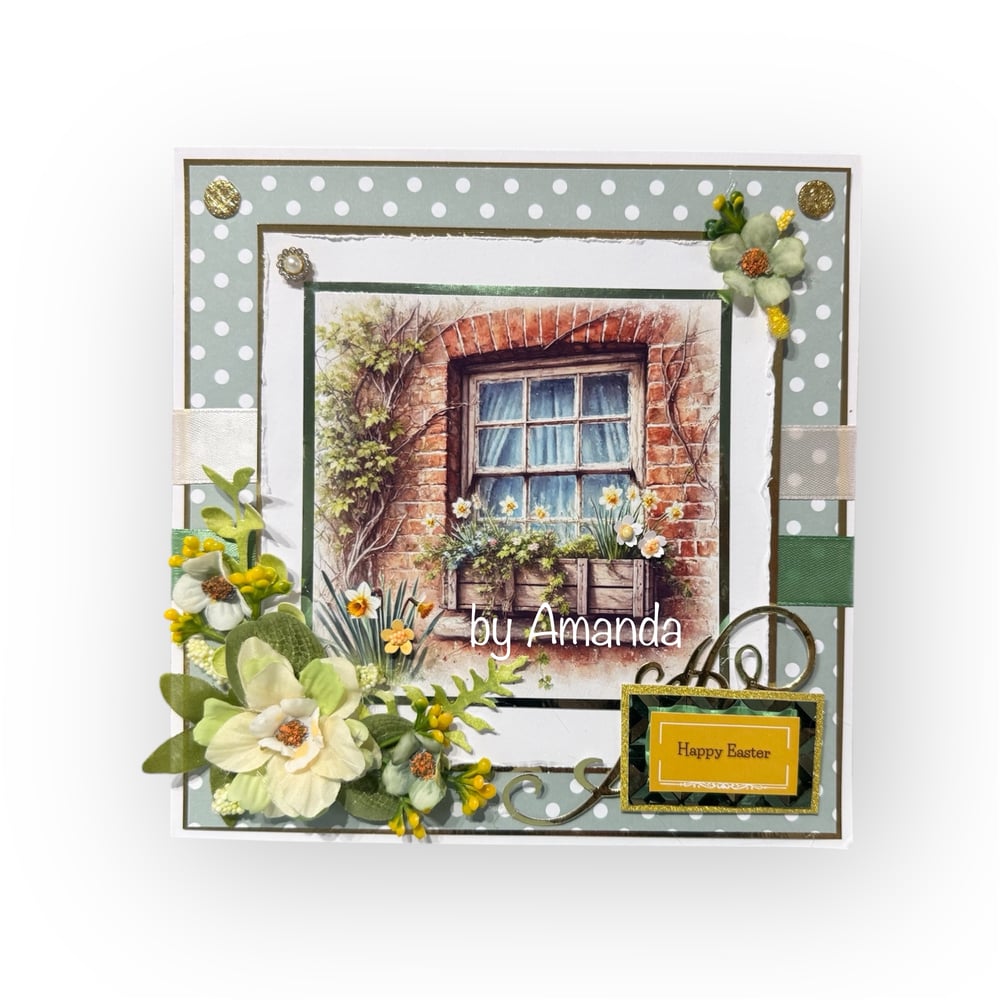
The Cottage Collection Handmade Card - With full supplies list - silk flowers, berries and lots of lovely dies
Happy Monday!! I hope you’re all well and safe after such a stormy weekend. 🌬️ Storm Éowyn certainly caused a bit of havoc! A few friends were left without power, and some had damage to roofs, fences, and gardens.
Here’s to wishing for a much calmer and brighter week ahead! Take care, stay cosy, and happy crafting! 💕✂️
I’m so excited to share all of this week’s new sheets and kits with you! 🎉 We’ve got a real mixed bag this week – something for everyone! From fabulous florals and vibrant papers, to fussy cutting fun and lots of NEW -technique-led products that I hope you’ll enjoy. ✨
** Disclaimer - complete transparency
The links to Digital Downloads are my own digital download products from my website -https://www.obyd.co.uk/
** Also as an Amazon Associate i may receive a small referral commission should you buy something through my UK Amazon affiliate links (if you would like to see what i have used and where to get it you can find the links where there is blue on the page) ** Please note that there is no charge to the customer for this.
So kicking of this week we have our new The Cottage Collection - Spring Daffs Window Box Cardmaking Topper Sheet - you can find it here on the website - https://shop.obyd.co.uk/b/gVp3u
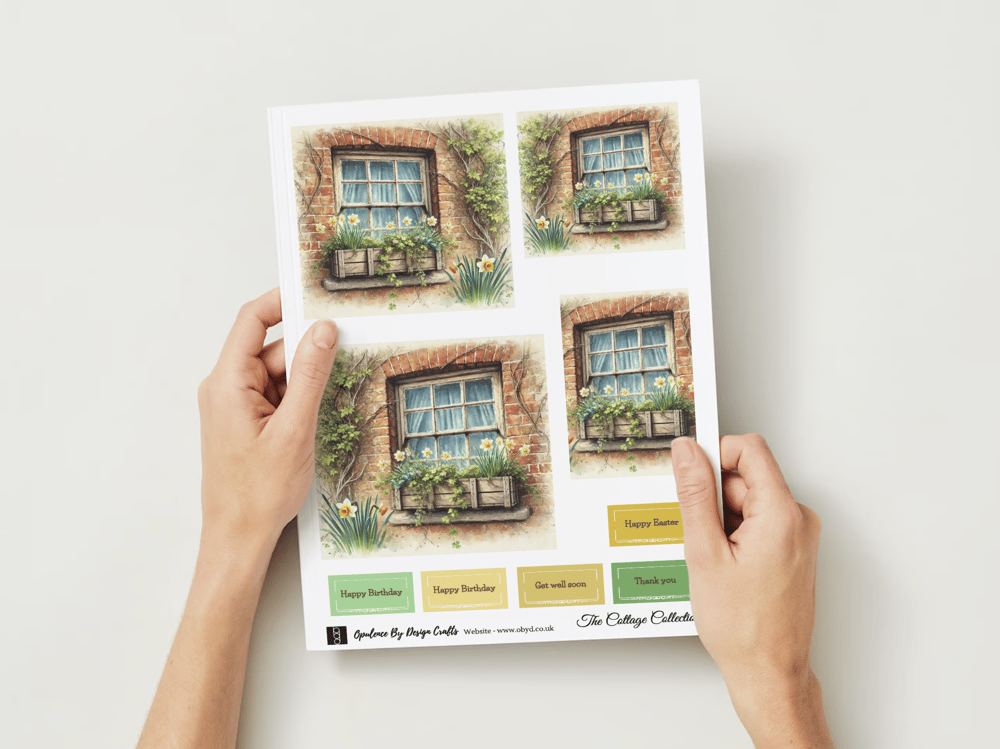
The Cottage Collection – Spring Daffs Window Box Cardmaking Topper Sheet 🌼✨
Bring the joy of spring to your crafting with our Spring Daffs Window Box cardmaking topper sheet! This A4 PDF digital download is perfect for a variety of creative projects.
What’s included:
- 4 x Spring Daffs Window Box Toppers
- 5 x Sentiments: 2 x Happy Birthday, Happy Easter, Get Well Soon, and Thank You
Though designed as a topper sheet, these beautiful designs can be used for so much more! Add a touch of charm to MDF pieces, glass art, albums, or journals. For a unique twist, try printing the sheet onto vellum or rice paper.
We did this in a class the other week so i thought i would type it all up for you so you could see what was used 🌿 I used leftover bits like stamens, berries, and ribbon to add extra texture and dimension.

The card blank is 8"x8" from my favourite Carblanks Company Craft Uk - you can find them here on amazon - https://amzn.to/4hwOnvO
The topper and sentiment are from the Cottage Collection sheet you can find it on the website here: https://shop.obyd.co.uk/b/gVp3u
To give the topper / image a nice glossy look this was printed onto my favourite photo paper - https://amzn.to/4jIC9Ca (i love the vibrancy this photo paper gives)
The polka dot paper is page 17 from our Happy Times in Harrogate Kit - https://shop.obyd.co.uk/b/1VdRX
The backing paper was printed onto 120gsm navigator paper - this pack offers amazing value for money - you can find it on amazon here: https://amzn.to/4aC0EwM
Yellow Stamens - Artificial Matte Flower Stamens - i buy these in a big mixed bundle but if you are looking just for the yellow ones you can find them here - https://amzn.to/40OdhRN
I've included a link to their Amazon shop so you can explore all the stamen packs and bundles they have available - here
Foliage
Spellbinders Foliage die set - https://amzn.to/42wuH6S
The fern is from this spellbinders foliage set - https://amzn.to/42u4VjN
All of the leaves were coloured with my bamboo mini ink pad - https://amzn.to/4hvmynA
I shaped the leaves using my Spellbinders flower and leaf forming tool set which you can find here: https://amzn.to/42qYPAF
I used some of my artificial Eucalyptus leaves that i had lying around from another project - you can find these here: https://amzn.to/40pJyNO (i find these great little fillers for going around my flowers)
The yellow berries i have used as fillers can be found here: https://amzn.to/3Cpdq4S i love cutting these up and using them on my cards and crafty projects - i think they add a lovely texture and interest to my cards. 1 stem goes a very long way (i love finding new things to go on my cards)
Flowers:
The larger flower was made up of layers of these - https://amzn.to/40B4Nwf and one of these smaller ones for the centre - https://amzn.to/4hv7mXv
( i love taking all of the layers apart to create my own flowers - there are 2 layers of cream and 1 layer of green with a smaller flower in the centre)
I used some of these - https://amzn.to/4hv7mXv white and green ones dotted around the card
Realistic flower centres:
The flower centres - i added a very small amount of tacky wet glue to the centre of the flowers using a cotton bud / Q-tip (glue - https://amzn.to/3Cqjt9h then dusted a small amount of pollen. I made up my own pollen mix by adding some of both of the below to an old little spice jar (thyme) and giving it a good shake:
Yellow Pollen - https://amzn.to/3WzbXjw
Orange Pollen - https://amzn.to/40Qf0pG
The gems and ribbon are from my stash
The gorgeous swirl flourish die is from a fabulous Spellbinders set - you can find it here - https://amzn.to/40MMLsc
Matting and Layering:
The non shed gold glitter sheets i used to mat the sentiment topper on can be found here: https://amzn.to/40yQQ1B i love glitter!! I really do but i don't like glitter coming off glitter sheets onto everything.. thats why i love using non-shed glitter sheets on my cards. The link here is for the gold option that i used on the card but there are some really beautiful colours on the same listing so why not take a peek at those too while you are there.
Gold mirror card - https://amzn.to/4jpTjV3
Tonic Studios - Mint green mirror card - https://amzn.to/40M5QuC
I used this embossing folder from Creative Expressions to emboss my mint green mirror card mat that i sat the sentiment on - https://amzn.to/42qYPAF
Added sparkle:
I added some subtle sparkle to my topper by adding some stickles for a glittery finish
Green was added to some of the foliage areas on the topper - https://amzn.to/3Cl8FcF
Yellow was added to the little daffodils on the topper - https://amzn.to/3PRNTEt
Adhesives:
Crafters Companion tape pens for the card and paper layers - https://amzn.to/4haWRbU
Hot Glue gun sticking down all of the embellishments - my little yellow one isn't available anymore so i didn't put a link. I have used a glue gun for over 30 years and i own 3: A small cool melt, a hot melt and a large one i use for my flower arranging. I recommend getting one with a long metal nib for cardmaking - they are so much easier to use! I have had many over the years - cordless ones, fancy ones and cheapie ones. If you would like to take a look at glue guns there is a vast selection available on amazon here: https://amzn.to/3PSphvt
I hope you have liked looking at this little project i really enjoyed making it and typing up the supplies list for you. *** Please note that the links for the products are from Amazon UK - all items were in stock at the point of writing this blog. If you are reading this in the future and the link doesn't work it is probably because the item has sold out.
Always feel as though you can reach out to me if you can't find something i am more than happy to help you try and find it or at least something very similar. You can always message me through facebook - https://www.facebook.com/OpulenceByDesign/
For more crafty inspiration check out our:
Facebook group - https://www.facebook.com/groups/672573406875861
Blog - https://shop.obyd.co.uk/blog/opulence-by-design-crafty-corner-blog
Download Shop - https://shop.obyd.co.uk/
Website - www.obyd.co.uk
For all of our social media accounts you can find the links here: https://linktr.ee/opulencebydesign
If you have Pinterest i would greatly appreciate a follow as i have spent weeks adding lots of card samples to my various boards - Cardmaking ideas, Christmas crafts, My Crafty Blog board and others so it would be awesome if you could pop over and show it some love - Pinterest Boards
Thank you for looking, happy crafting as always! A xo
Comments
Post a Comment