
Japanese Style Tag card with printed vellum ivy leaves and cherry blossom inked flower blog post

Good morning from a sunny up't North..
The sun is shining and the sky is blue.. what a lovely morning. I hope you like today's little projects
* Disclaimer
The links to Digital Downloads are my own digital download products from my website -https://www.obyd.co.uk/
** Also as an Amazon Associate i may receive a small referral commission should you buy something through my UK Amazon affiliate links
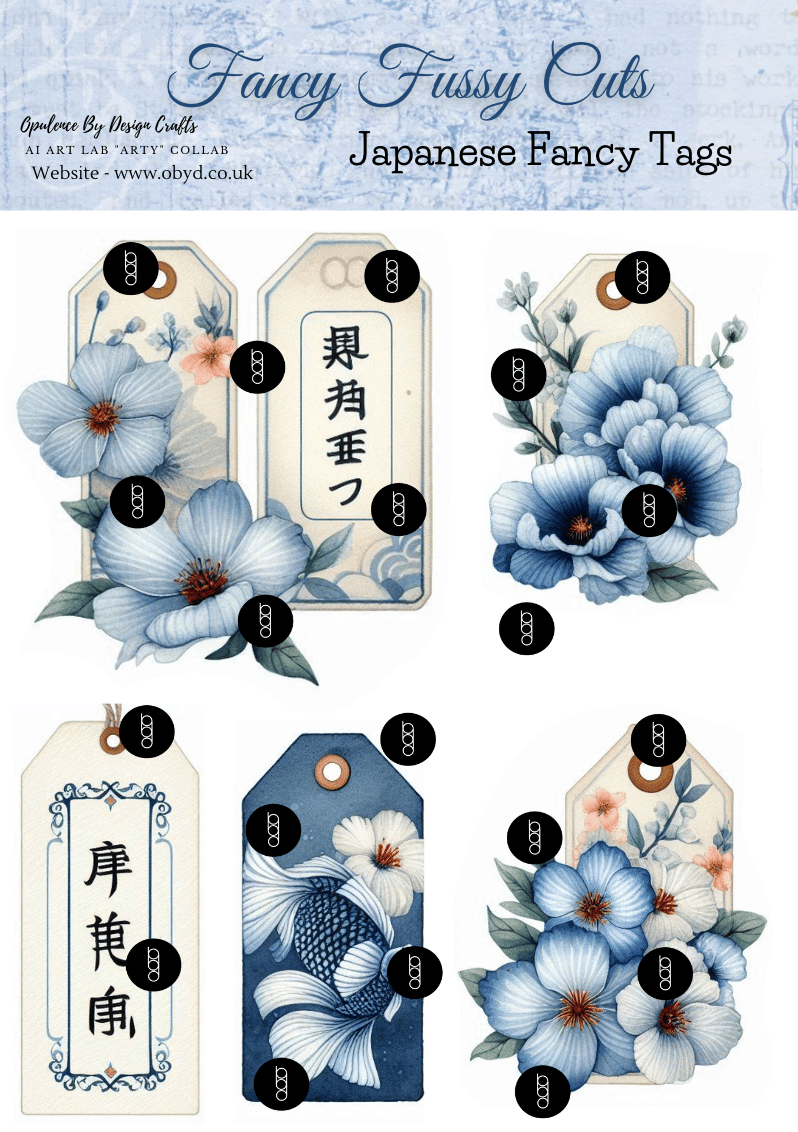
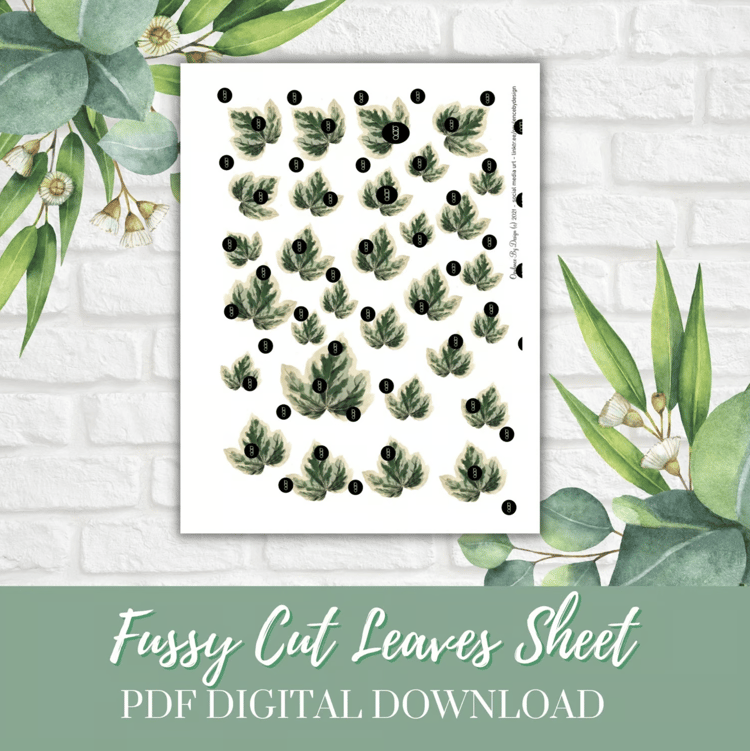
Fancy Fussy Cut Sheet - Japanese Style
Unleash your creativity with our new Fancy Fussy Cut Sheet, inspired by the elegance of Japanese art. This sheet features five exquisite elements that are more than just tags. Use them to create stunning tags for gifts, or let them shine as toppers or embellishments for cards, albums, and beyond. These designs are sure to get your crafty juices flowing. I can't wait to see the masterpieces you create with them!
You can find it on the website here: https://shop.obyd.co.uk/b/cby38
You can find all of this weeks Japanese themed craft sheets and paper kits on the website here
This sheet contains:
1 x A4 Sheet Of Japanese Themed Fussy Cuts - 5 individual elements
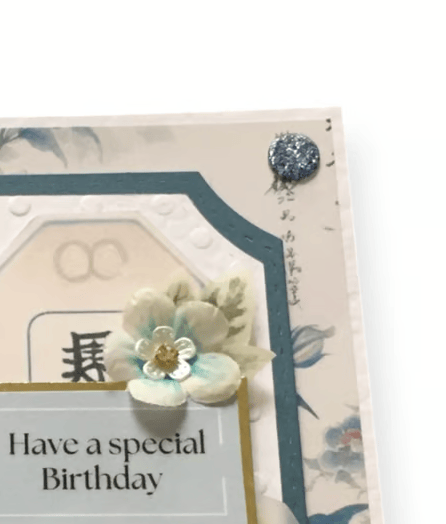
Here is the little card i made for the launch:
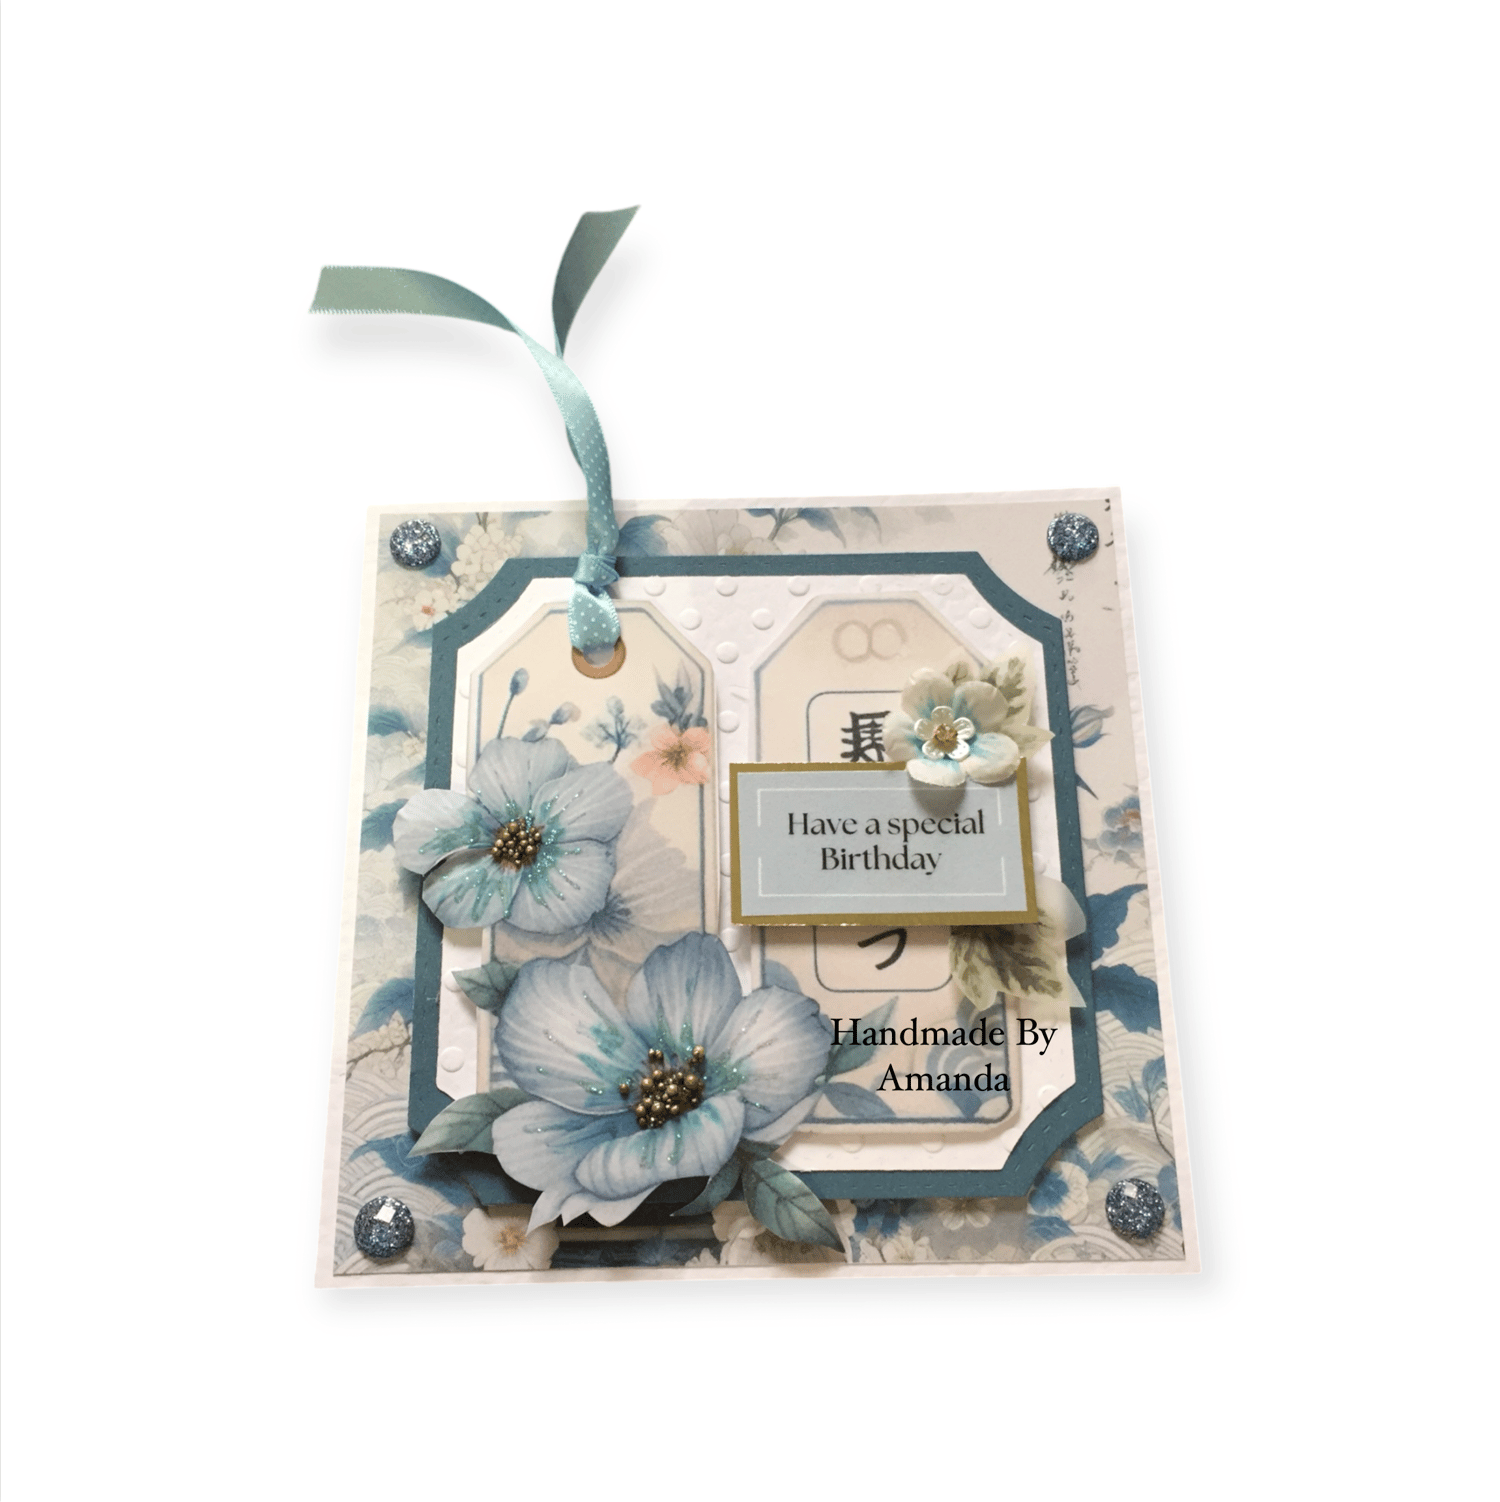
Supplies List:
- The tag topper is from today's fancy fussy cut sheet - https://shop.obyd.co.uk/b/cby38
- The backing paper is from our Blue Japanese themed paper pack here - https://shop.obyd.co.uk/b/Nm0Cz
The blue paper was one i had printed from my plain colours paper pack
- The sentiment is from this topper sheet - https://shop.obyd.co.uk/b/RDHnj
- The fussy cut sheet and backing paper was printed onto my favourite printing paper for toppers and papers - https://amzn.to/485UweC
- 300gsm card white hammered 5x5 card blank - https://shop.obyd.co.uk/b/RDHnj
- The large decorative frame nesting die set can be found here - https://amzn.to/489gQnM
- Polka Dot embossing folder - https://amzn.to/3YqvO5B used for the white layer (after cut with the frame die)
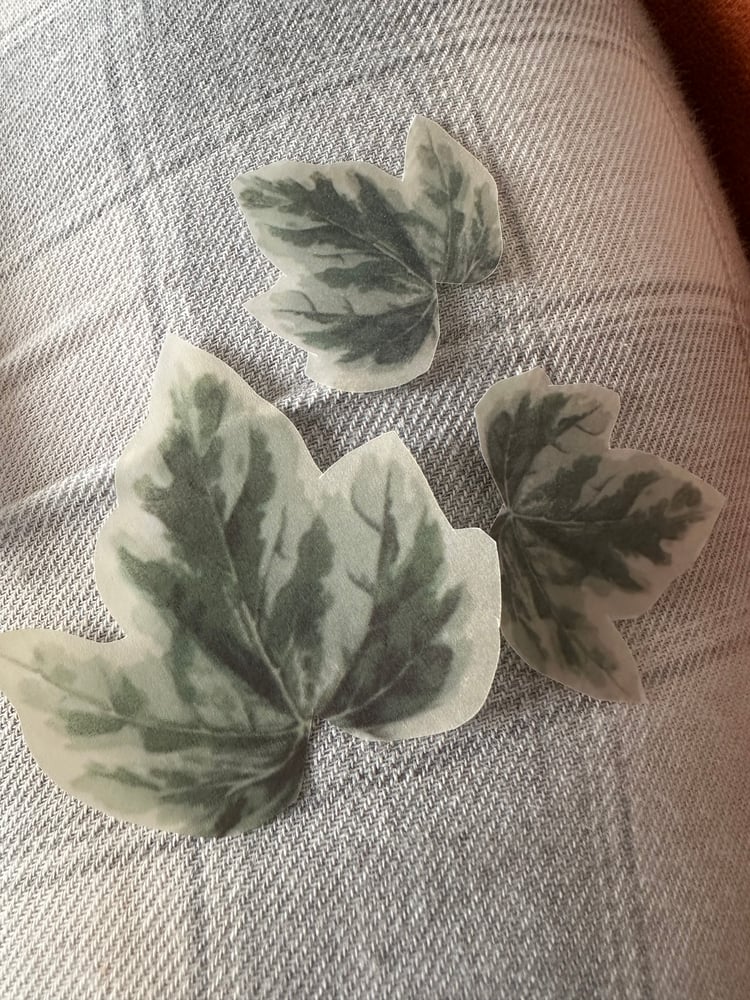
- The ivy leaves are our Print, cut and form leaves - https://shop.obyd.co.uk/b/zJHWx
- The ivy leaves were printed onto my favourite printable vellum - https://amzn.to/3U8lSva
the flowers look like this on the vellum:
- The flowers can be found here - https://amzn.to/489ZPd3 (the gem used for the centre is from my stash i added a little blue ink to pull through some colour on the flower)
- The gems are from Hobby Lobby in the US
- Gold mirror card - https://amzn.to/3NtFoOR
- Blue Stickles was used to add some sparkle to the flowers on the tag - https://amzn.to/3BKKNyh
- The stickles was also used to adhere the prills for the flower centres. You can find the prills i used here - https://amzn.to/3A0fjnw
- I used a ranger ink pad to add some turquoise ink to the flower petals on the tag on the left and on the small silk flower. This was applied with a ear bud / q-tip. You can find the ink pad here: https://amzn.to/4ePrEds
Adhesives used:
- My favourite Tape pens used for the papers are from Crafters Companion - https://amzn.to/3U7itMQ
- Foam Pad tape on a roll is from doCrafts - https://amzn.to/3Udjx1R ( i used this for the sentiment)
- My glue gun was used to stick down the flower and ivy leaves
Tools and Equipment used:
- Tonic Trimmer - https://amzn.to/4eIXDvJ (i have the older version which is a different colour this is the newer model - i have had mine about 14 years)
- My die cutting machine that i used for die cutting and embossing is an electronic die cutting machine it is from Crafters Companion Gemini - i have had mine for 3 years and there is a new model available now if you would like to take a look you can find it on amazon here: https://amzn.to/4eMekpU
I used a foam mat and ball tool to shape the flowers on the tag to give them some depth and dimension
- Tonic Ball Tool - https://amzn.to/4eKK9PT
- Foam Mat - i have had mine for over 10 years mine is A4 but you can find the same one as an A5 here - https://amzn.to/3BOEt9f
I also made some tags using the Fussy cut sheet
Once downloaded and saved i printed these onto 300gsm card (same brand as the card blanks - i have used this brand for over 14 years) - https://amzn.to/3YrwXKh
I cut the tags out, added some stickles and now they are ready to have ribbon slotted through ready for gifts
(I used same blue stickles to the flowers on the left hand-side card the link above its the same one i used for the card)

I hope you have liked looking at today's projects i really enjoyed making them and typing up the supplies list for you. *** Please note that the craft supplies links for the products are from Amazon UK - all items were in stock at the point of writing this blog. If you are reading this in the future and the link doesn't work it is probably because the item has sold out.
Always feel as though you can reach out to me if you can't find something i am more than happy to help you try and find it or at least something very similar. Or if you are not in the UK.
You can always message me through facebook - https://www.facebook.com/OpulenceByDesign/
Thank you for reading today's post
For more crafty inspiration check out our:
Facebook group - https://www.facebook.com/groups/672573406875861
Facebook Page - https://www.facebook.com/OpulenceByDesign/
Blog - https://shop.obyd.co.uk/blog/opulence-by-design-crafty-corner-blog
Download Shop - https://shop.obyd.co.uk/
Website - www.obyd.co.uk
For all of our social media accounts you can find the links here: https://linktr.ee/opulencebydesign
If you have Pinterest i would greatly appreciate a follow as i have spent weeks adding lots of card samples to my various boards - Cardmaking ideas, Christmas crafts, My Crafty Blog board and others so it would be awesome if you could pop over and show it some love - Pinterest Boards
Thank you for looking, happy crafting as always! A xo
Comments
Post a Comment