There’s something really special about turning beautiful materials into something handmade, and this card felt like one of those little moments of joy from start to finish.
I actually created this project a few weeks before heading off on holiday, but I held back from sharing it at the time. With our Gerbera download collection launching, I didn’t want to cause any confusion about the products I was using in the samples. That said, these dies work beautifully alongside the collection, so if you’re looking to add dimensional flowers to your cards, they’re a fantastic option. They’re especially perfect for creating stunning Gerbera-inspired designs, making it easy to build eye-catching floral projects with plenty of depth and detail. 🌼
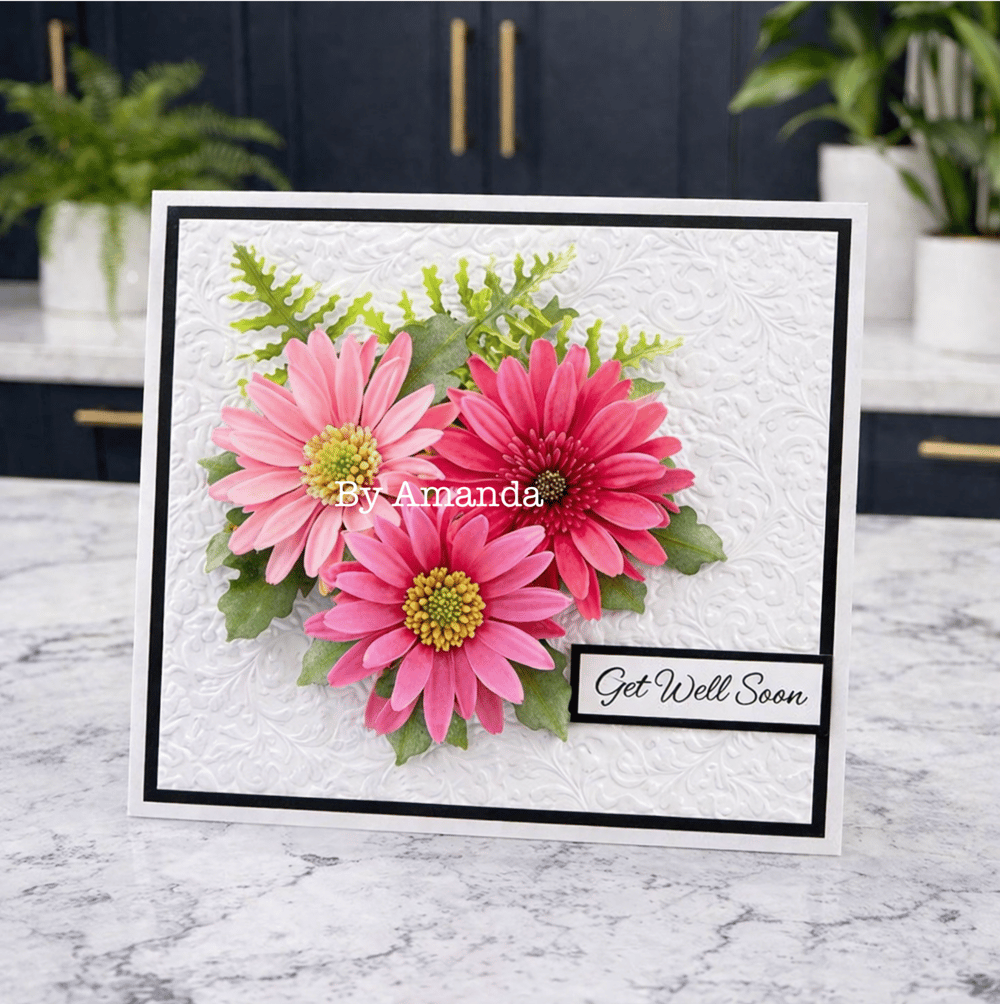
The beautiful background is a gorgeous white textured cardstock is from Dollarama. Laura kindly sent it to me, and I have to say—it’s absolutely stunning. The pack also includes mostly pearl sheets with a similar faux embossed design, so when I first spotted the white sheet at the back, I assumed it was just there as a protective layer. Imagine my surprise when I flipped it over and realised it had the same beautiful pattern! Such a lovely unexpected bonus, and definitely too pretty not to use.
For contrast, I paired it with a deep navy cardstock. In the photos it almost looks black, but that’s just the lighting playing tricks— in real life it has this rich, inky blue tone that works perfectly against the soft white texture.
The focal point of the card is a floral arrangement created using dies and tools from Spellbinders. I used the Gerber Daisy die set from Susan Tierney-Cockburn’s Painter’s Garden Collection—a set of finely detailed metal dies designed to build a dimensional daisy. It’s such a versatile set, perfect for creating layered blooms that really come to life on your project. I also incorporated coordinating foliage dies from Spellbinders to add fullness and balance to the arrangement. You also get the adorable Lady Bug die with this set too!
To shape and assemble the flowers and leaves, I used the Spellbinders tool set, which really helps bring that natural, dimensional look to each petal and leaf.
For colour, I kept things soft but vibrant by blending a selection of alcohol markers along with PanPastels. This combination adds depth and subtle shading, giving the petals a more realistic feel while still keeping that handmade charm.
All the elements came together into a card that feels elegant but still full of personality. It’s always so satisfying when something unexpected—like that “not just a backing sheet” moment—turns into the highlight of a project.
This was such a fun make, and a lovely reminder to always take a second look at your supplies… you never know what hidden gems you might find!
As an amazon associate i may receive a small referral commission on eligible items sold though my affiliate links, this is at no cost to you but it does help support my videos and blog posts
Shopping List for the card:
Spellbinders Gerbera Daisy Die set - https://amzn.to/4t8HvL9
Spellbinders Fern Die set - https://amzn.to/4slS0cK
Spellbinders Susans Garden Essential Tool set (T-021)
Copic Markers (links below)
PanPastels for colouring: This is my favourite set for foliage: https://amzn.to/47RFx9w
How to make the flowers
There are videos available on YouTube from Susan and Spellbinders that you can watch and craft along with, gently guiding you through the process of shaping, colouring, and building up of these flowers step by step.
Colouring
When it comes to colouring, I’ve built up a mix of marker pens from all sorts of brands over time, and they
each have their place on my desk. That said, I do have a bit of a soft spot (and a slight regret!) when it comes to my old Copic collection. When I moved to Canada, I gave away a huge set, and I still think about it now! They’ve always been my go-to for colouring flowers and leaves because the shades blend so beautifully, making it easy to achieve those soft, seamless transitions on petals and foliage. I’m slowly rebuilding my collection, even though they are definitely an investment—but it really is true that you get what you pay for. While I enjoy and regularly use other marker brands too, I always find myself reaching for my Copics when I want that reliable, high-quality finish, especially for detailed floral work where smooth blending makes all the difference
If you would like to take a look at the Copic Range you can find their shop on amazon here:
You can find their Classic Singles here - https://amzn.to/4vgO2VF
You can find their little video and colour chart here: https://amzn.to/4mphzZi
I hope you’ve enjoyed this blog post and found it helpful and inspiring. It’s always such a pleasure to share these creative moments and little discoveries along the way, and I hope it’s encouraged you to take another look at your own supplies and start creating. Whether you’re experimenting with textured cardstock or building up beautiful floral elements, I hope you feel inspired to give it a go and make something truly special. Happy crafting! ✂️
Happy crafting! 💕xo
Shop & More Inspiration
You can find all of my downloads here:
(The shop is listed in date order with the newest items at the top, and there are categories for toppers, backing papers, tea bag tiles, bunting kits, foiling downloads, digi stamps and more.)
If you don’t have a printer, I also have a selection of Printed Cut and Craft Books/Kits available worldwide on Amazon:
For more tutorials and inspiration, visit my blog:
You can find my youtube channel here: https://www.youtube.com/@opulencebydesign
💬 Join the Community
- Dedicated Cardmaking & Papercrafting Group
- https://www.facebook.com/groups/672573406875861
- Hobbies, Home & Sharing Group (all crafts welcome!)
- https://www.facebook.com/groups/772476691713676
Comments
Post a Comment